V tomto dokumente pomocníka sa dozviete, ako vytvoriť dokument, priradiť schvaľovateľov, dokument podpísať a schváliť, doručiť ho, sledovať jeho stav a prijímať dokumenty.
Dokument sa vytvára zo šablóny, voliteľne sa odosiela schvaľovateľom, doručuje obchodnému partnerovi a následne sa sleduje prostredníctvom pevne definovaného súboru stavov. Všetky tieto kroky sa vykonávajú v Editore dokumentov.
Vytvorenie dokumentu #
Nový dokument môžete vytvoriť jedným z dvoch spôsobov:
- V ponuke Nové vyberte možnosť Dokument.
- Prostredníctvom rýchleho odkazu Nový dokument.
Otvorí sa stránka Vytvoriť nový dokument, ktorá zobrazuje šablóny priradené k účtu, zoskupené podľa typu dokumentu (napríklad „300 – Predajné objednávky“, „500 – Fakturácia a vystavovanie faktúr“). Šablóny môžete vyhľadávať podľa názvu, filtrovať podľa Pracovného priestoru alebo cez Ďalšie šablóny otvoriť celú knižnicu. Výberom šablóny sa dokument otvorí v Editore dokumentov.

Poznámka: Nový dokument nie je spočiatku uložený. Najskôr použite možnosť Uložiť koncept – tým sa dokument vytvorí, zobrazí na Dashboarde a sprístupnia sa možnosti schvaľovania a podpisovania.
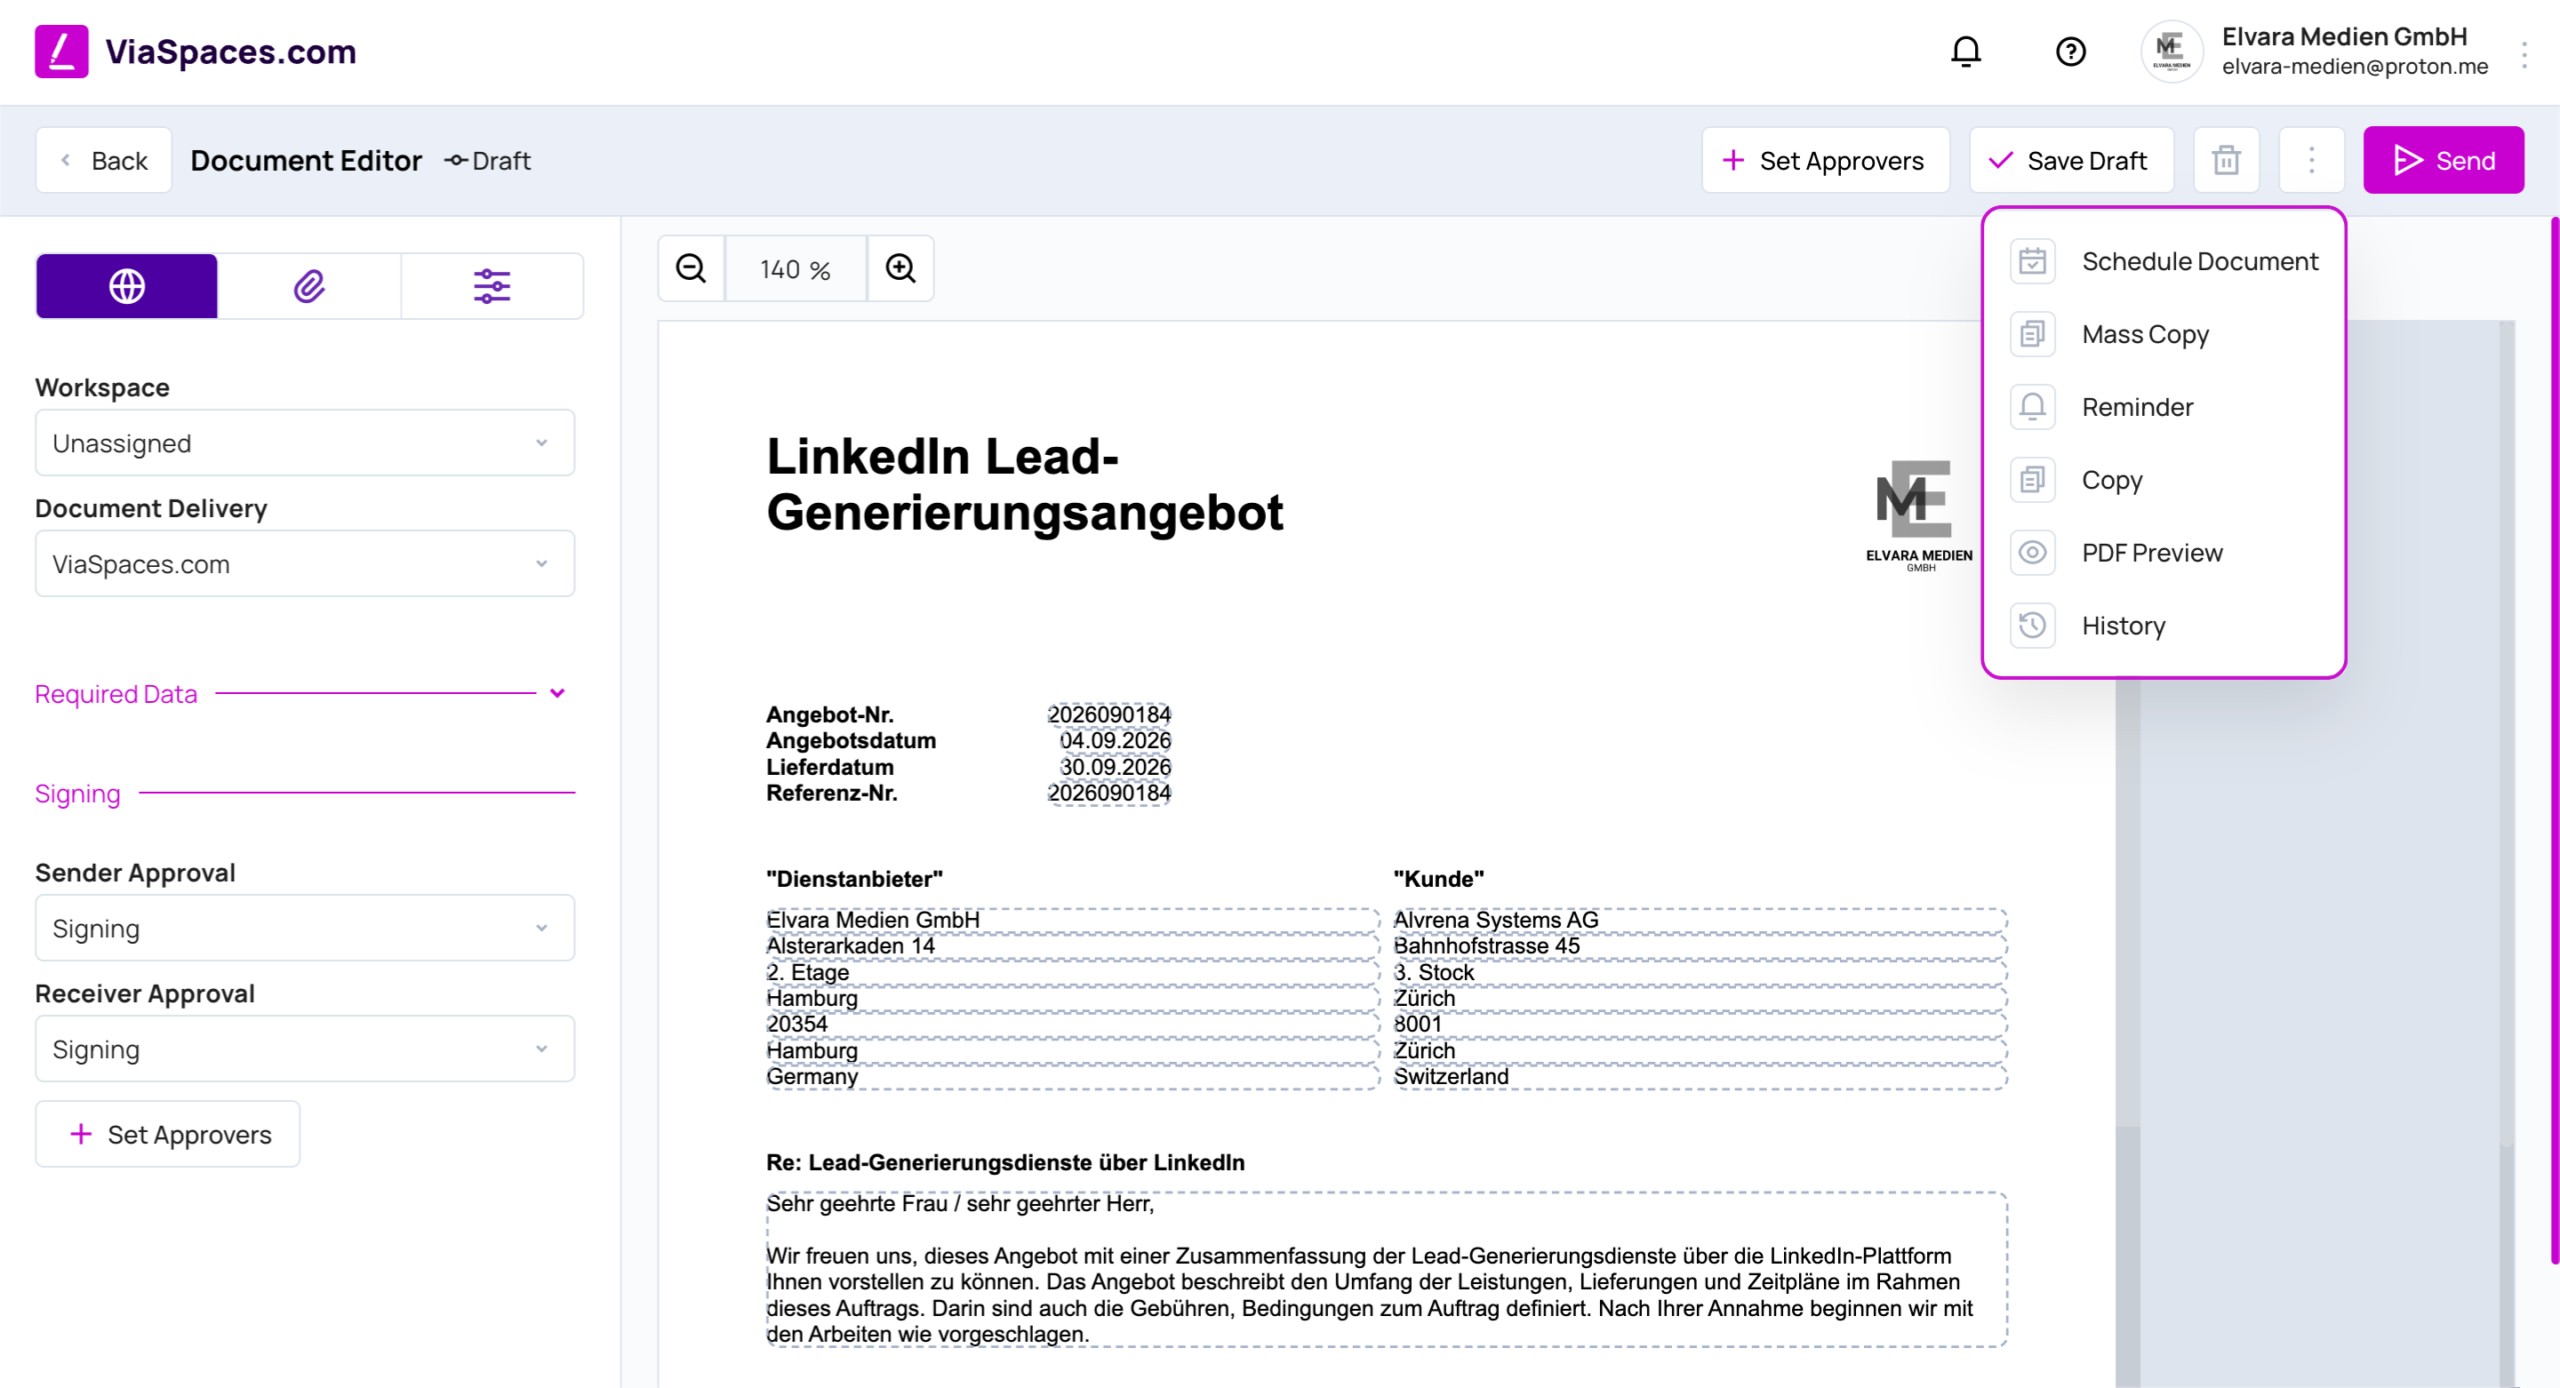
Editor dokumentov obsahuje ľavý panel s tromi kartami: zobrazenie dokumentu, Prílohy a Nastavenia. Ľavý panel zároveň obsahuje:
- Pracovný priestor — priradí dokument k pracovnému priestoru. Predvolená hodnota je Nepriradené.
- Doručenie dokumentu — určuje spôsob doručenia dokumentu (pozri Typy doručenia).
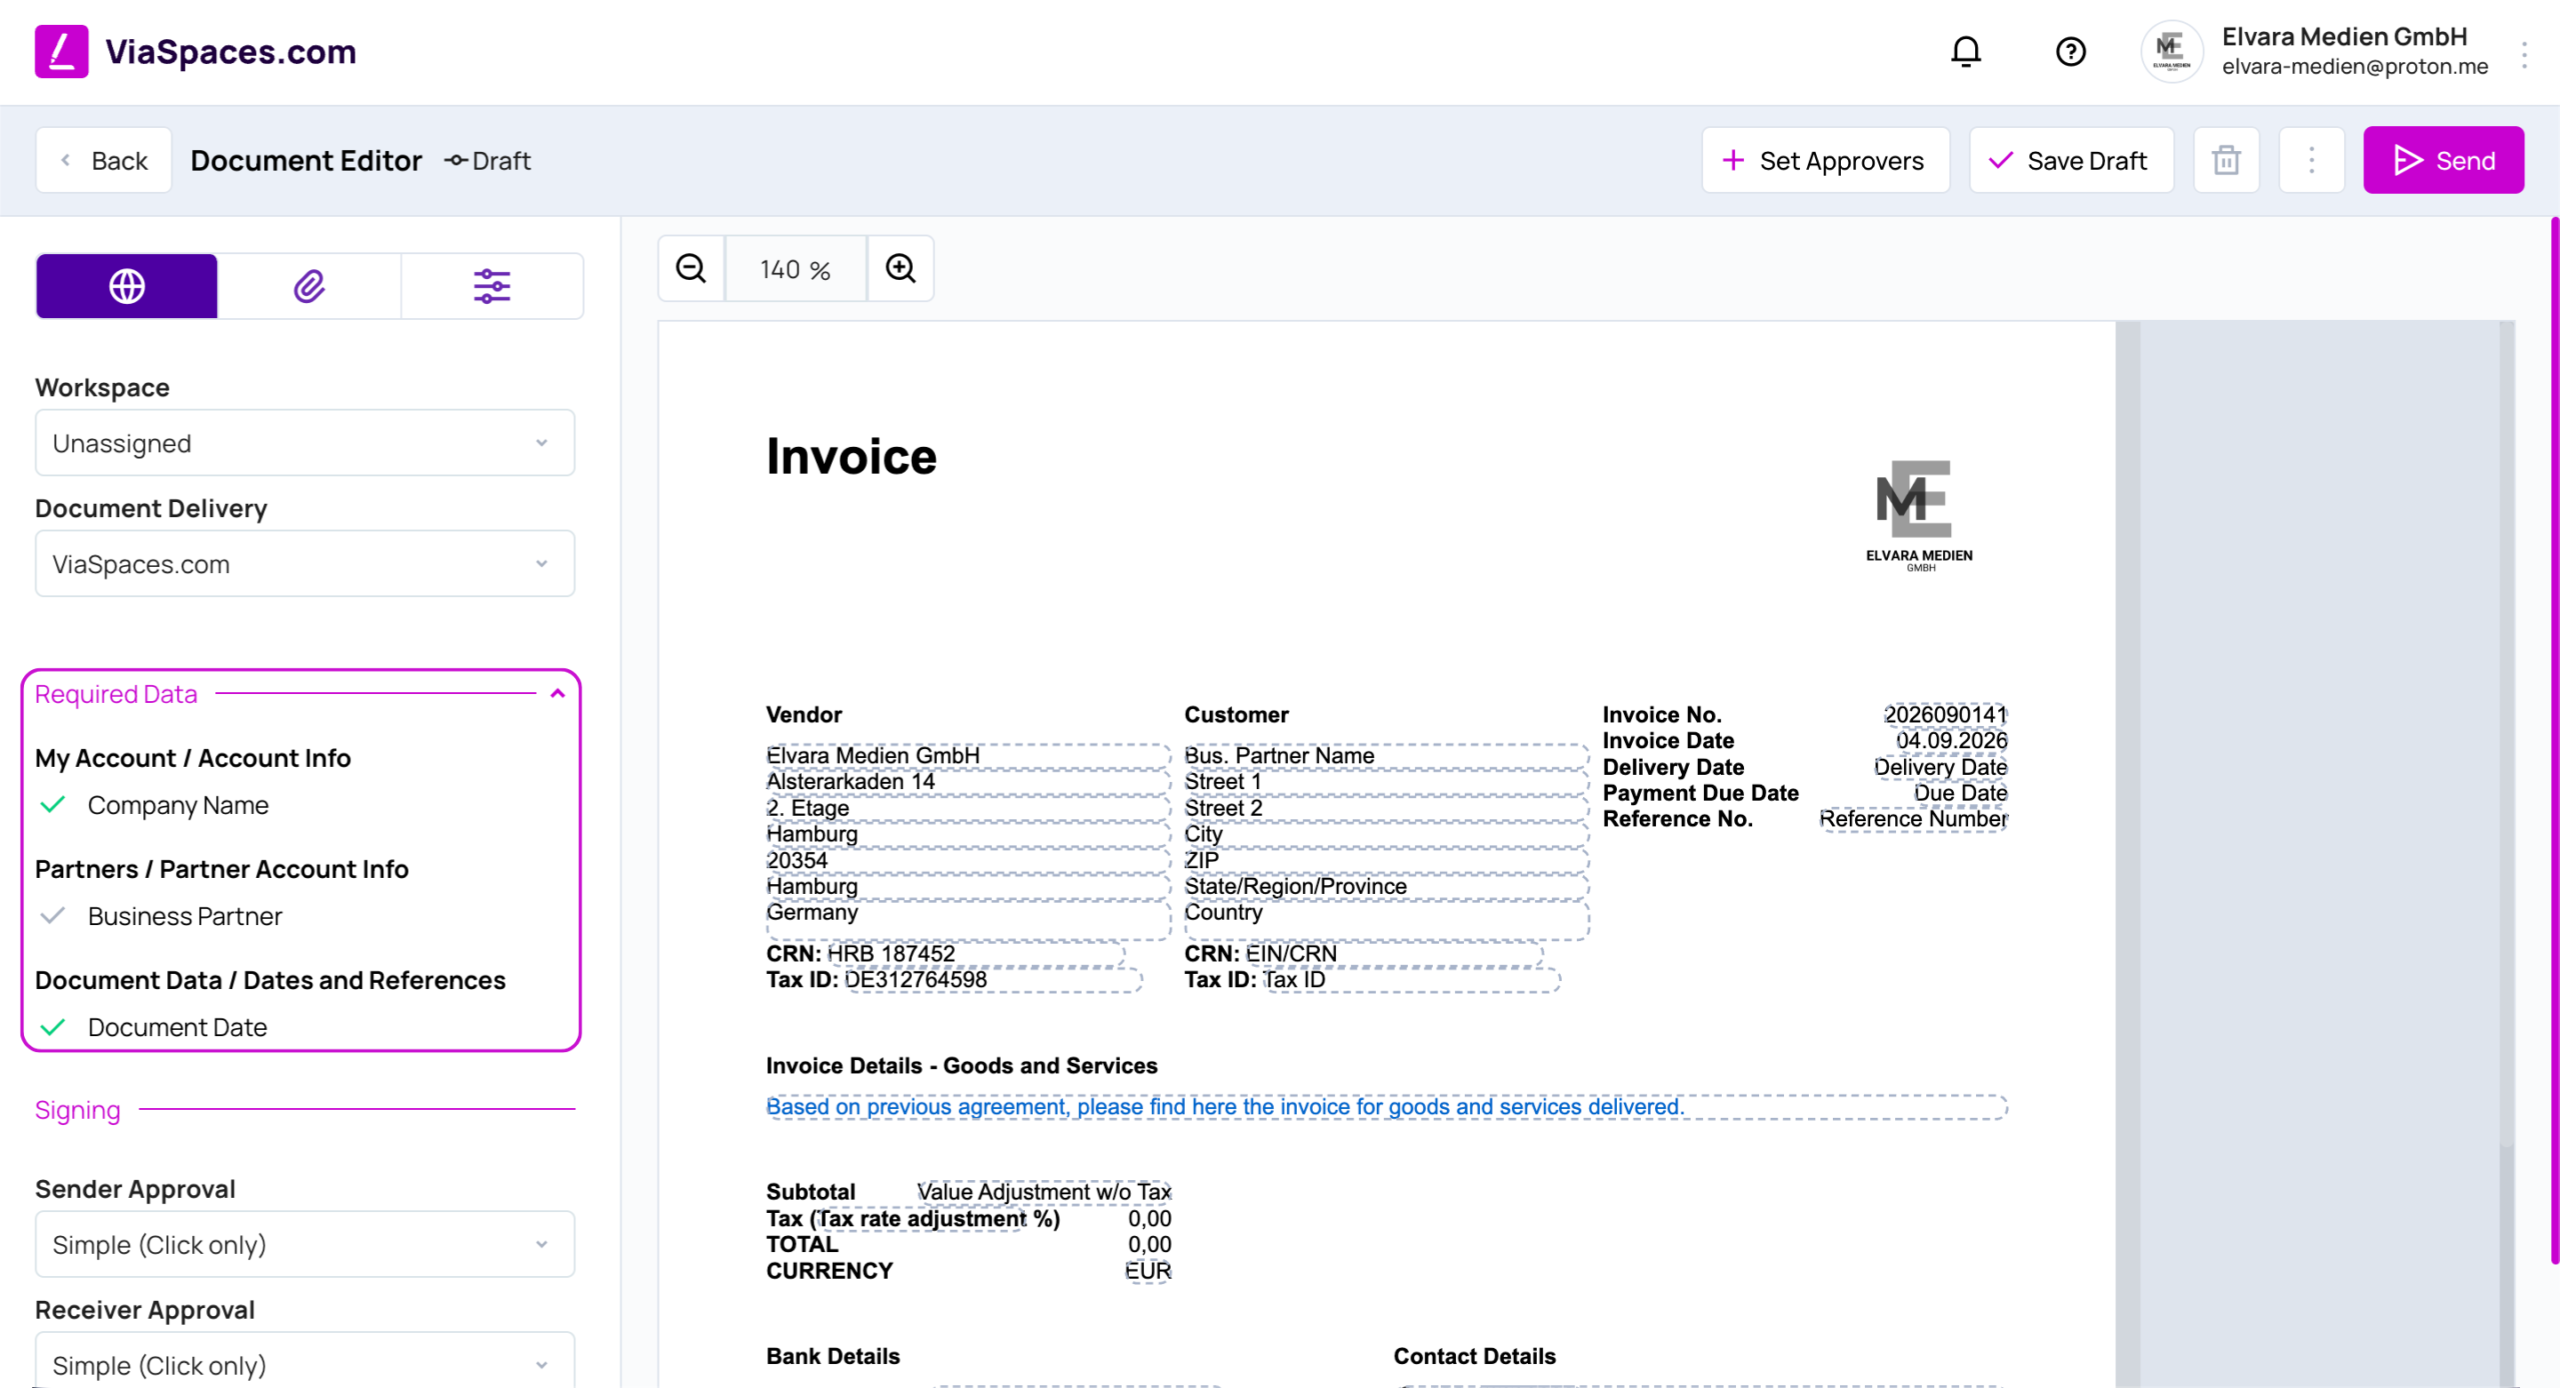
- Povinné údaje — kontrolný zoznam polí, ktoré musia byť vyplnené pred odoslaním dokumentu. Polia sú zoskupené do sekcií Môj účet / Informácie o účte (napríklad Názov spoločnosti), Partneri / Informácie o účte partnera (Obchodný partner) a Údaje dokumentu / Dátumy a referencie (Dátum dokumentu). Zelená fajka označuje každú splnenú položku.
Polia dokumentu vyplňte priamo v náhľade. Položky sa pridávajú z časti Položky v základných údajoch; v rozbaľovacom zozname sa zobrazujú iba aktívne položky. Súhrnné hodnoty – suma bez dane, daň a hodnota dokumentu – sa vypočítavajú automaticky v predvolenej mene účtu nastavenej v časti Nastavenia.
Pomocou panela nástrojov môžete priblížiť alebo oddialiť náhľad a otvoriť Náhľad PDF. Dokument je možné odoslať iba obchodnému partnerovi, ktorého stav prepojenia je Aktívny.
Priradenie schvaľovateľov #
Proces schvaľovania sa nastavuje v sekcii Podpisovanie na ľavom paneli. Táto sekcia sa zobrazí po uložení konceptu a iba pri dokumentoch, ktoré zahŕňajú podpisovanie.
Pre každú stranu je možné nastaviť spôsob schválenia:
| Spôsob schválenia | Odosielateľ | Príjemca | Správanie |
|---|---|---|---|
| Žiadne | — | Dostupné | Bez kroku schvaľovania. |
| Jednoduché (iba kliknutie) | Dostupné | Dostupné | Schválenie kliknutím na „Schváliť“. |
| Podpisovanie | Dostupné | Dostupné | Schválenie podpisom. |
Schvaľovanie prebieha jedným z dvoch spôsobov:
- Rýchle schválenie — nie sú nastavení žiadni interní schvaľovatelia, preto sa dokument na strane odosielateľa schváli okamžite.
- Interné schvaľovanie — sú určení schvaľovatelia, ktorí musia dokument schváliť predtým, ako môže pokračovať do ďalšieho kroku.
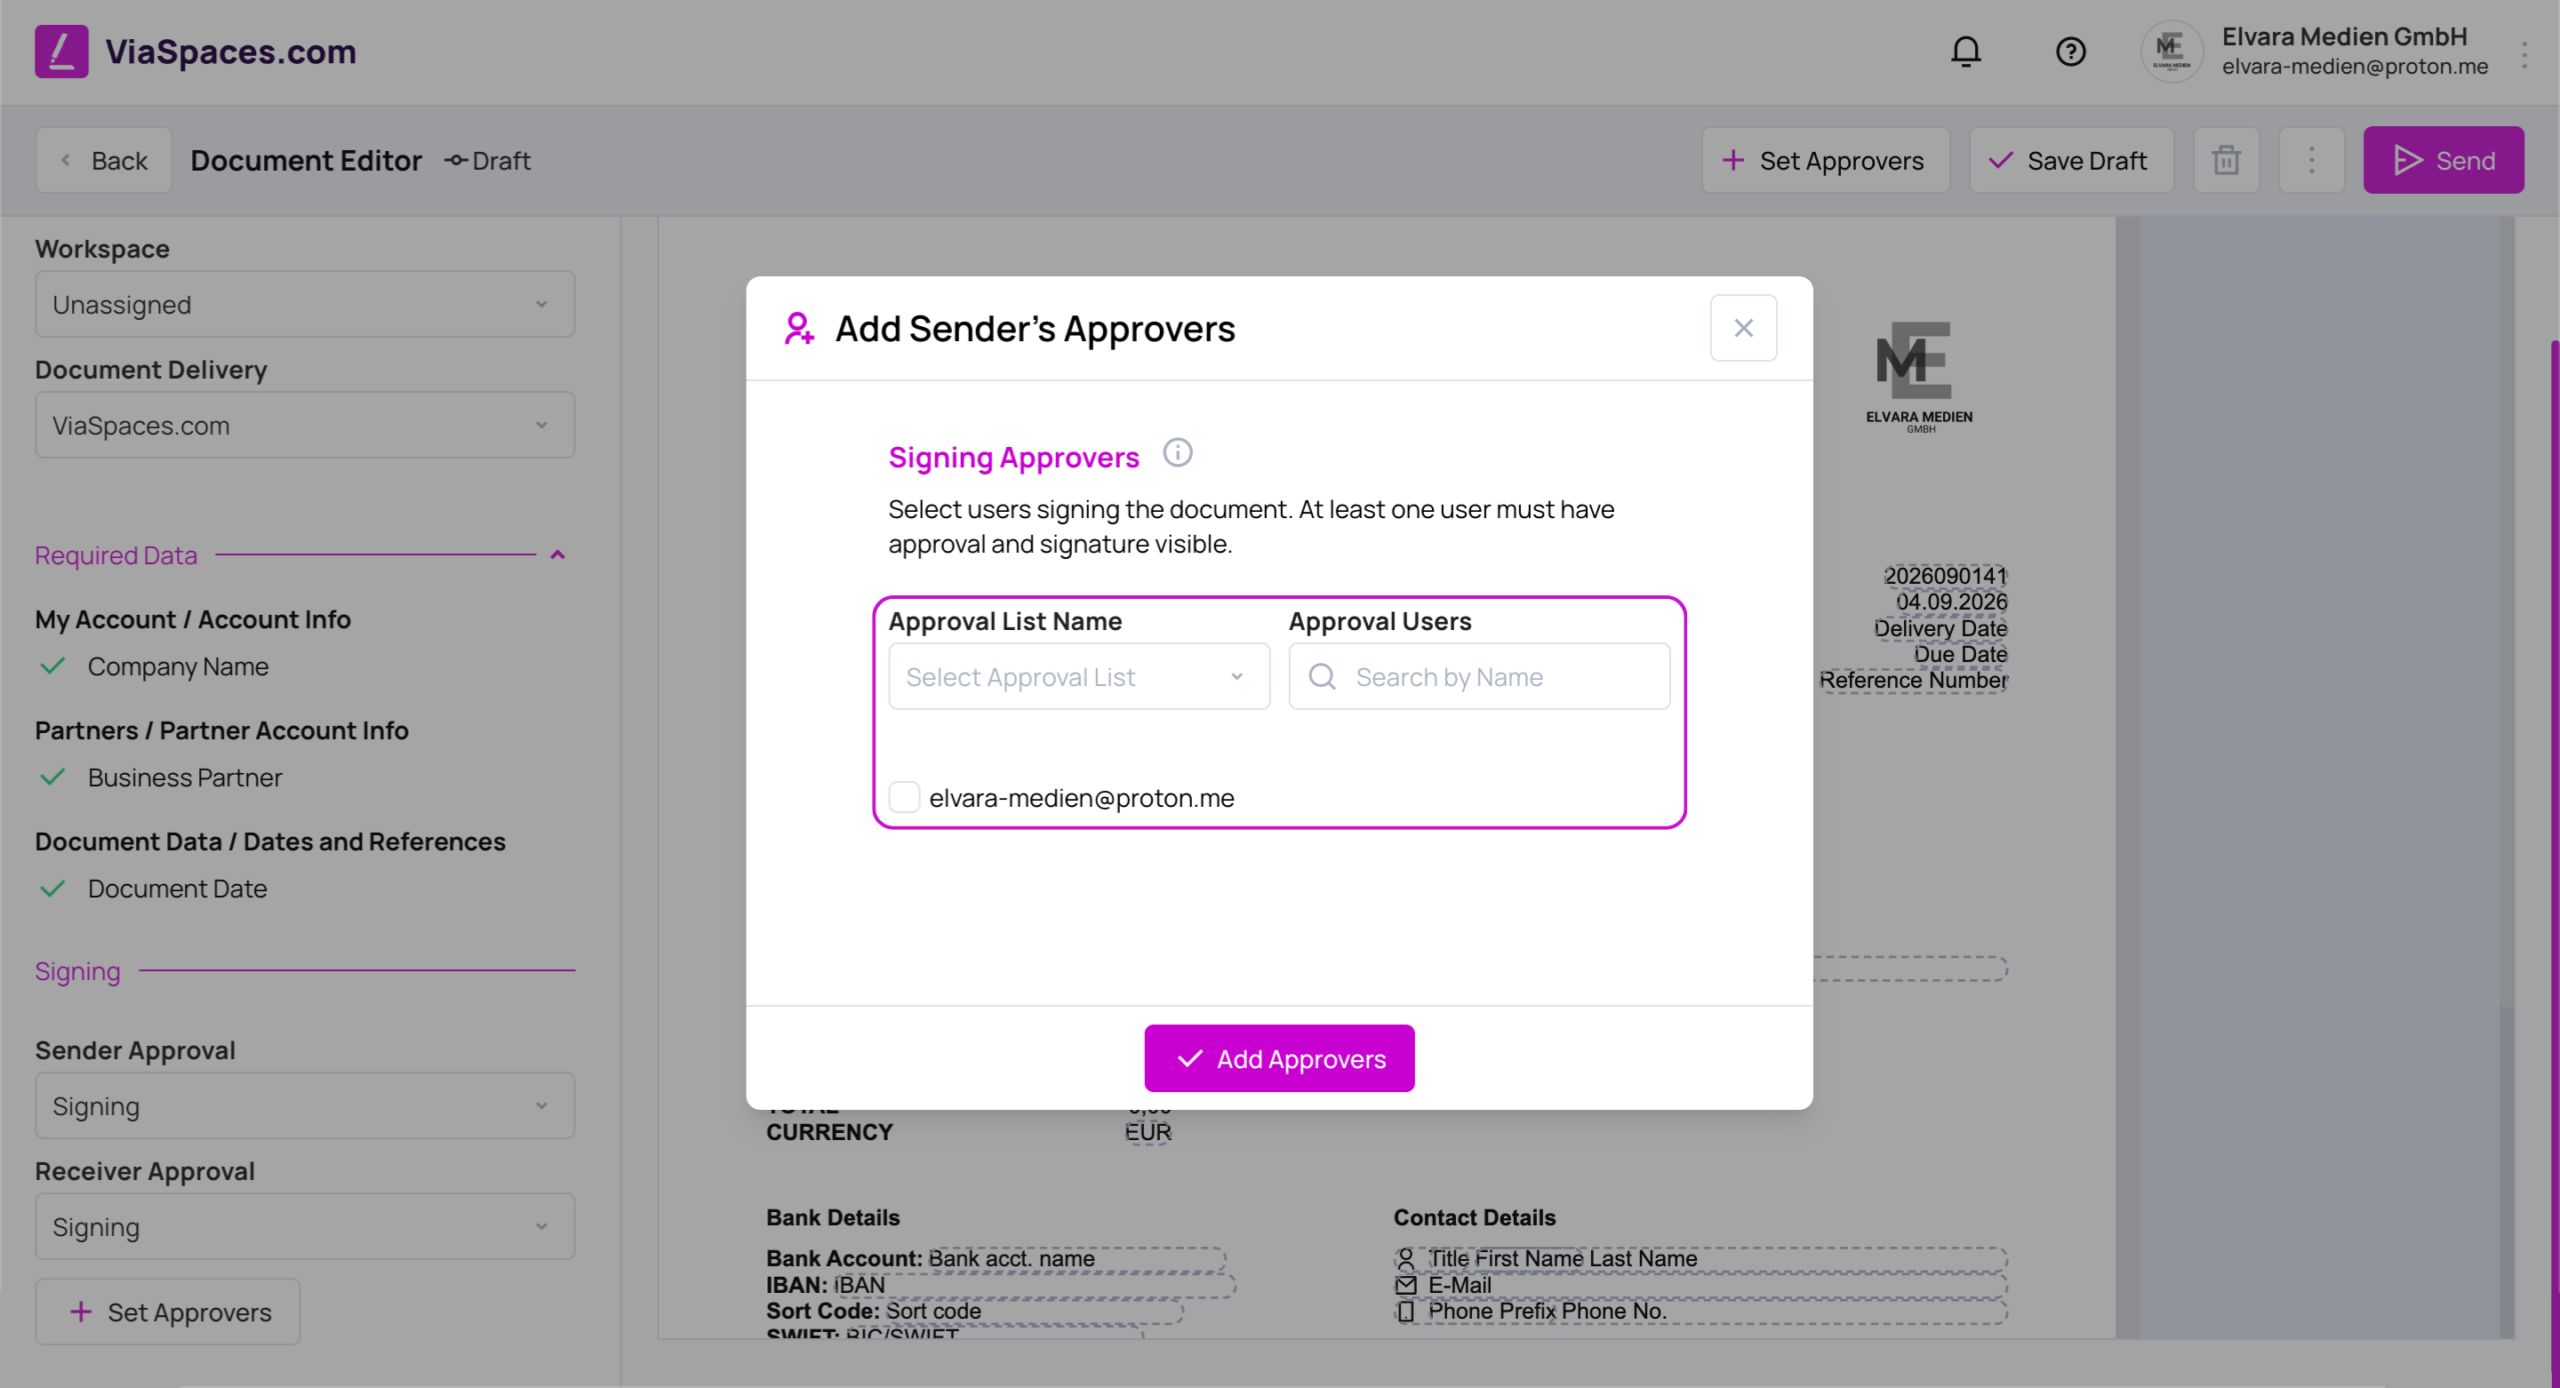
Nastaviť schvaľovateľov sa aktivuje po uložení konceptu. Otvorí sa dialóg Pridať schvaľovateľov odosielateľa:
- Vyberte Zoznam schvaľovateľov podľa názvu alebo v časti Schvaľujúci používatelia vyhľadajte používateľov podľa mena.
- Označte schvaľovateľov.
- Kliknite na Pridať schvaľovateľov.
Neaktívne zoznamy schvaľovateľov sa nezobrazujú. Vybraní schvaľovatelia sa zobrazia vo Všeobecných informáciách a v audit traili.
Podpísanie a schválenie #
Schvaľovateľ pracuje s dokumentom prostredníctvom možností Schváliť alebo Zamietnuť. Zvolený spôsob podpisovania určuje priebeh: Jednoduché (iba kliknutie) schváli dokument kliknutím, zatiaľ čo Podpisovanie vyžaduje podpis. Podpisovanie sa vzťahuje na všetky dokumenty, pri ktorých je tento spôsob nastavený, nielen na dokumenty doručované externe. Podpisy sa nastavujú v používateľskom profile; externí príjemcovia podpisujú prostredníctvom Externej brány.
Pri viacerých schvaľovateľoch musia dokument schváliť všetci, aby získal stav Dokončené | Akceptované. Jediné Zamietnutie ukončí schvaľovací proces so stavom Dokončené | Zamietnuté.
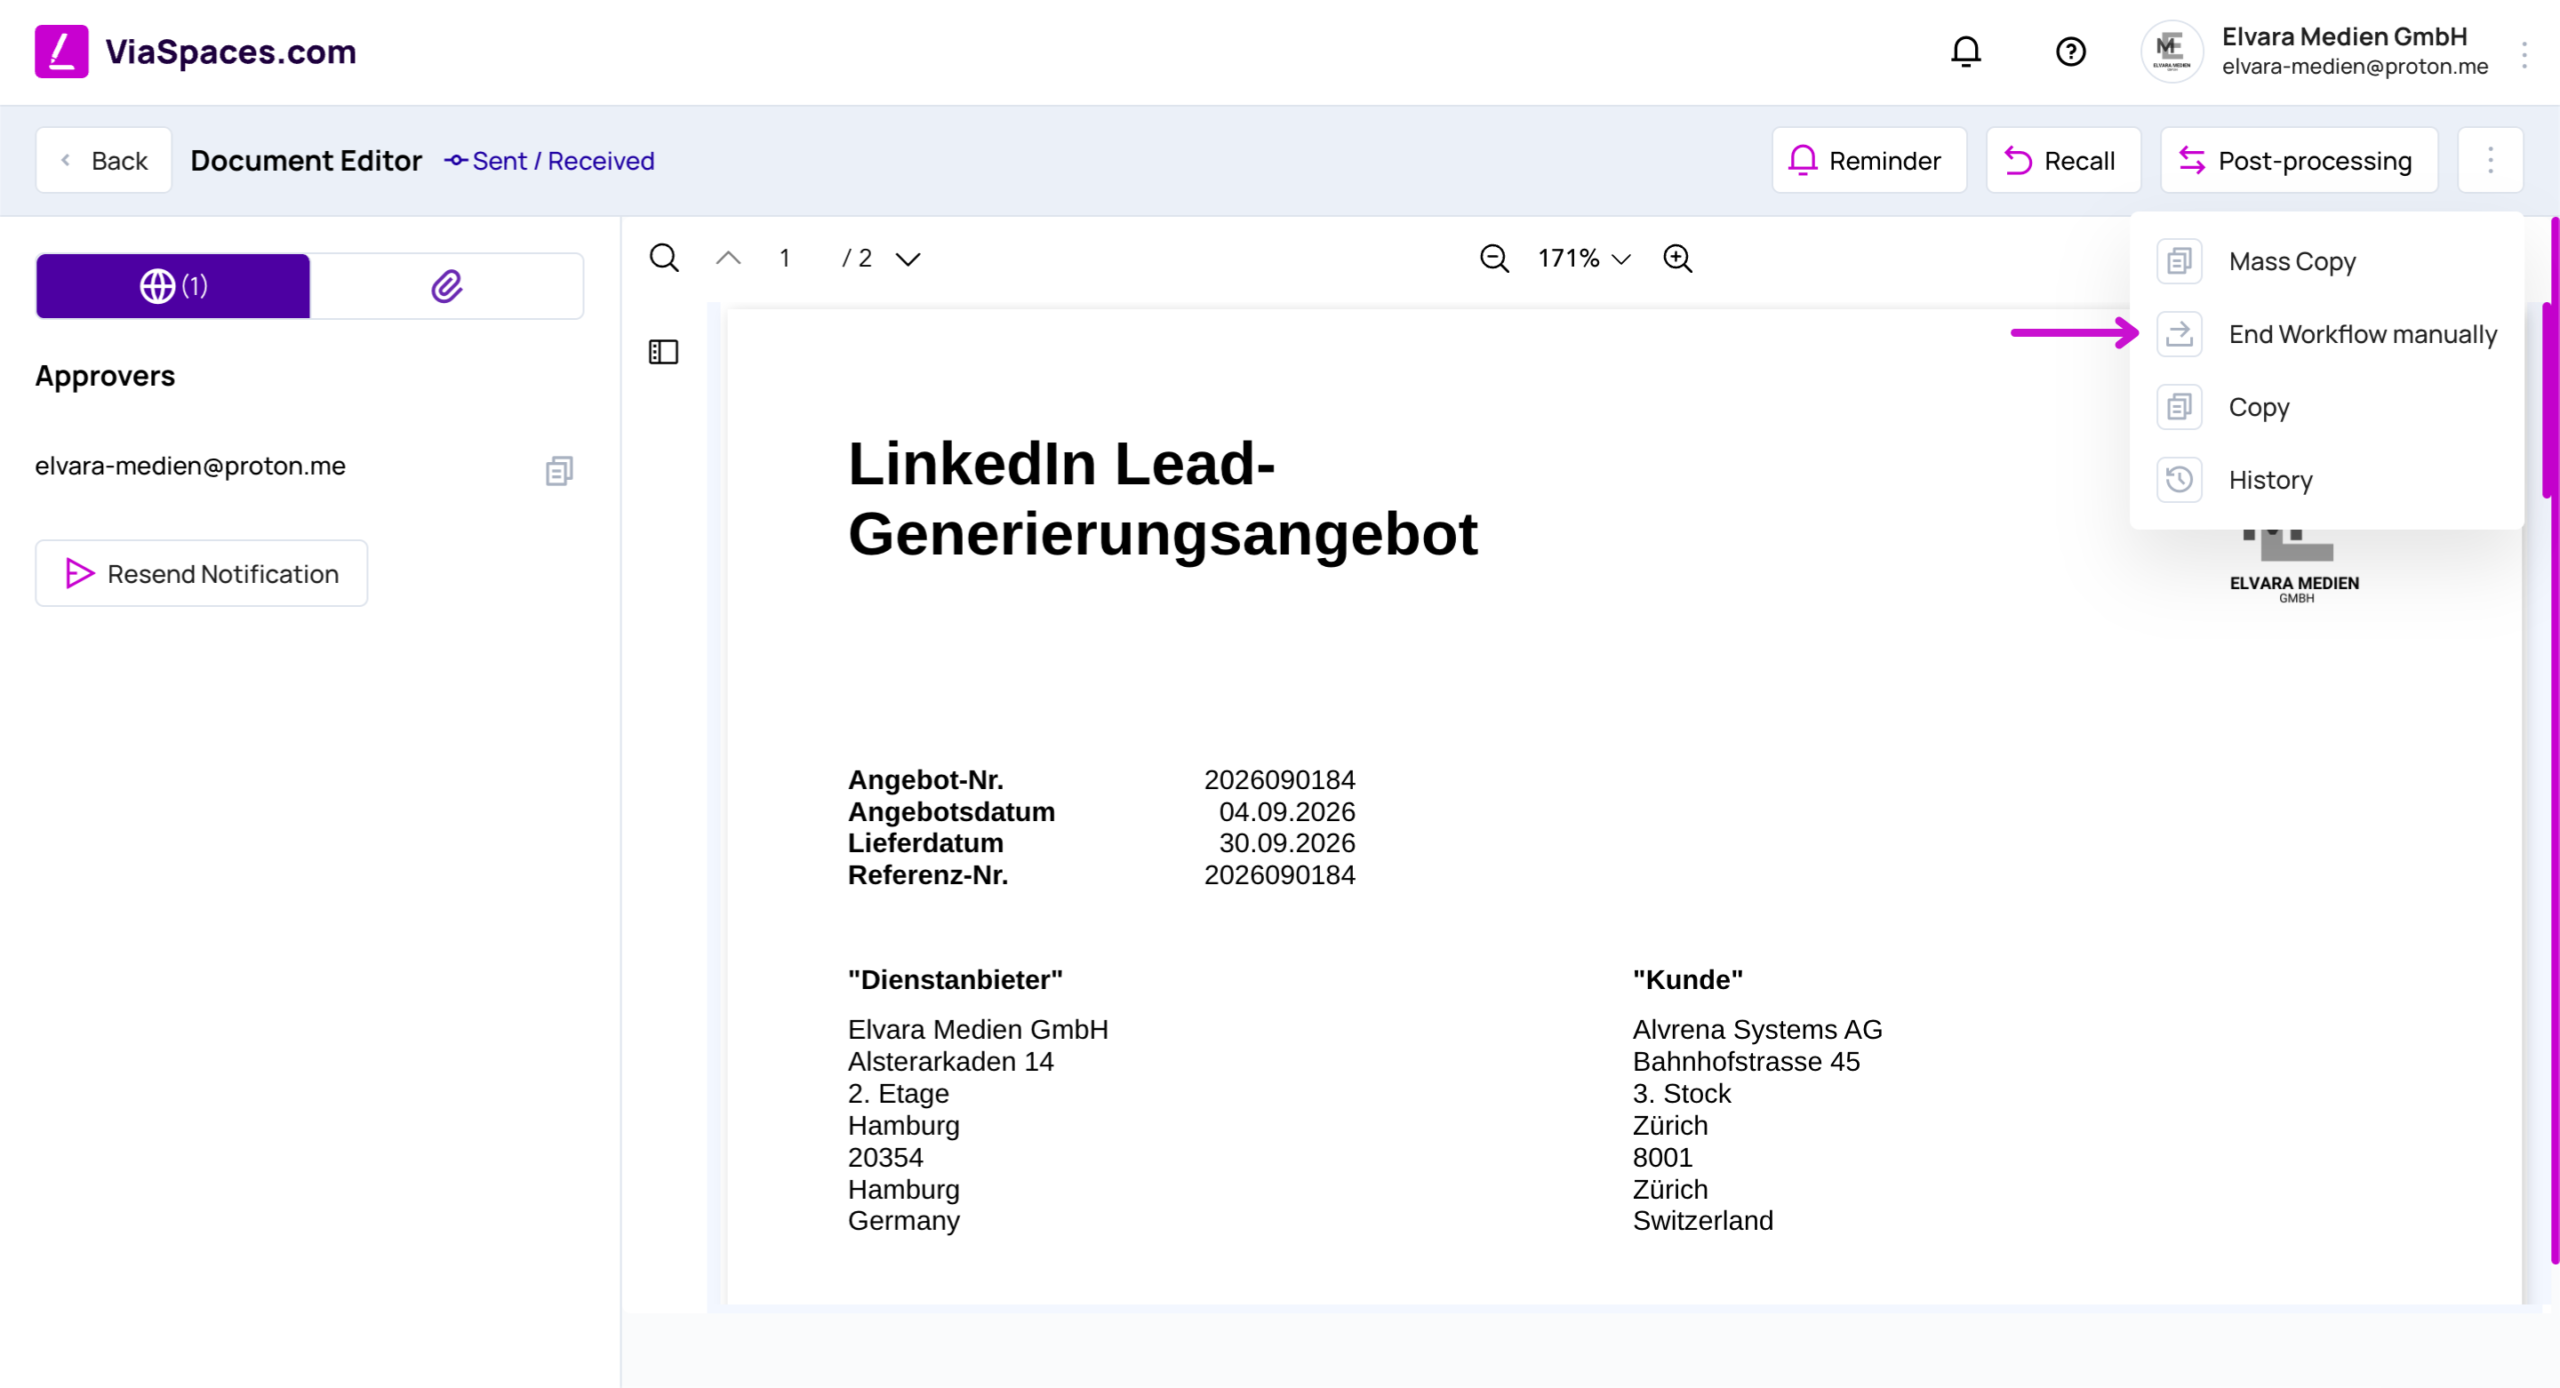
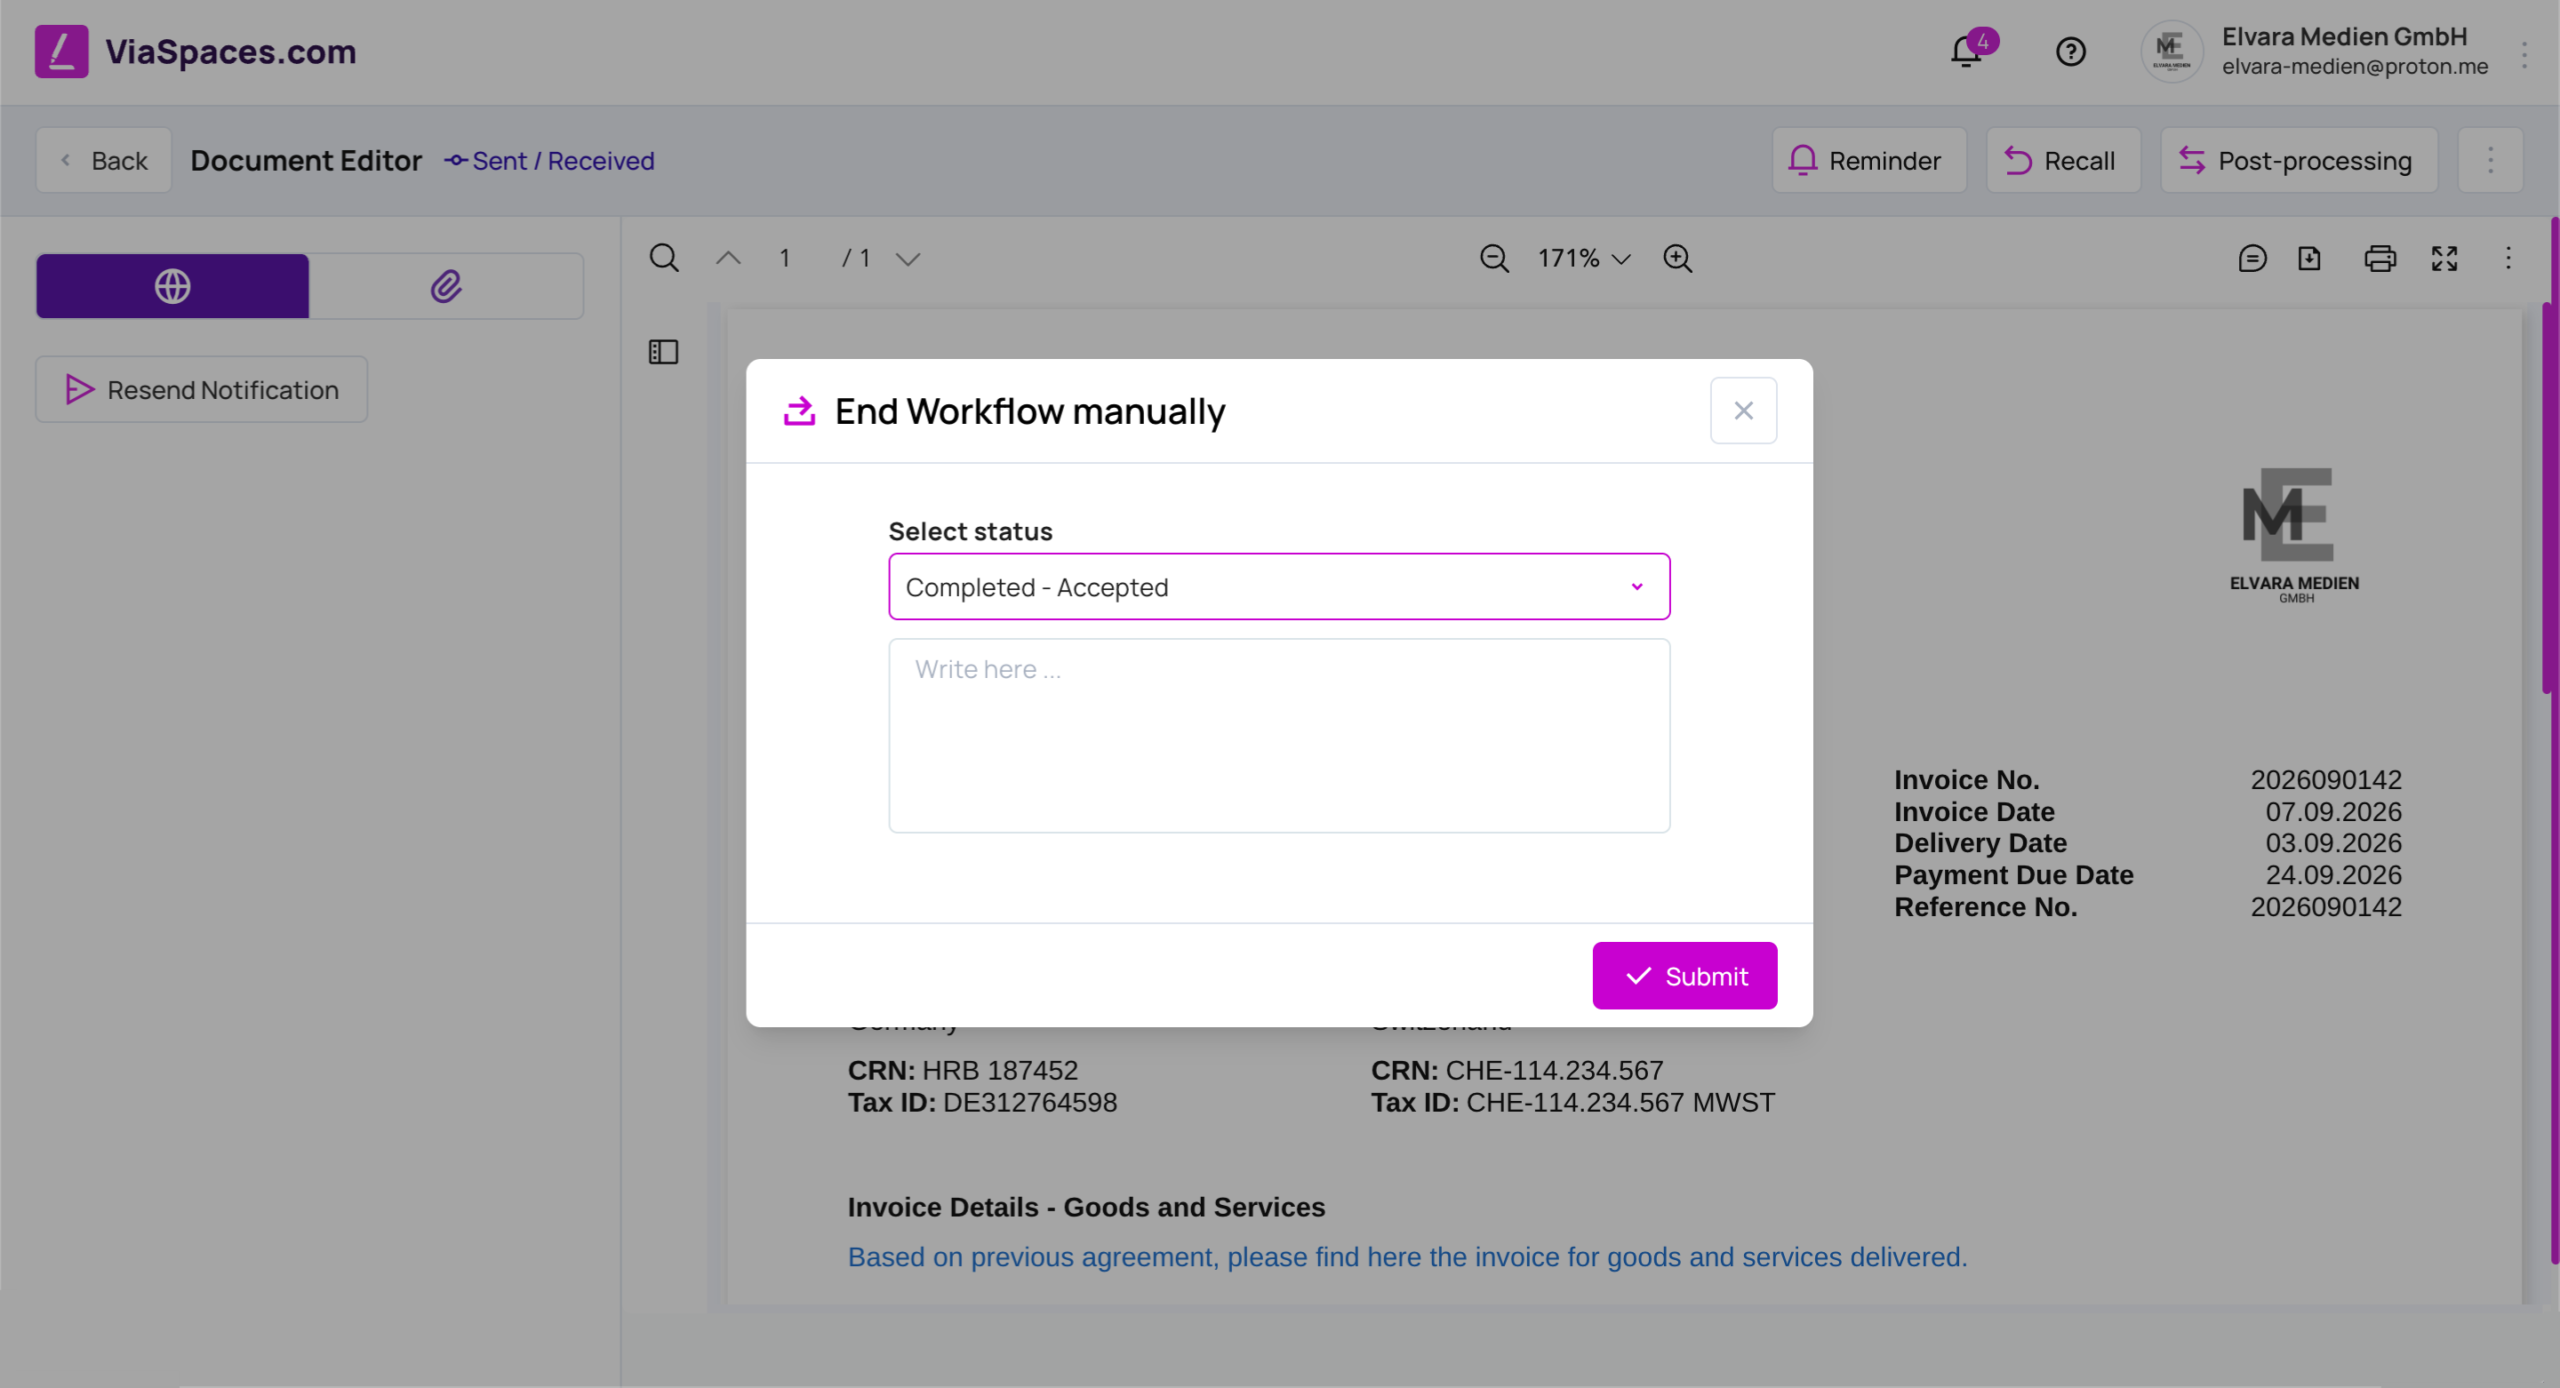
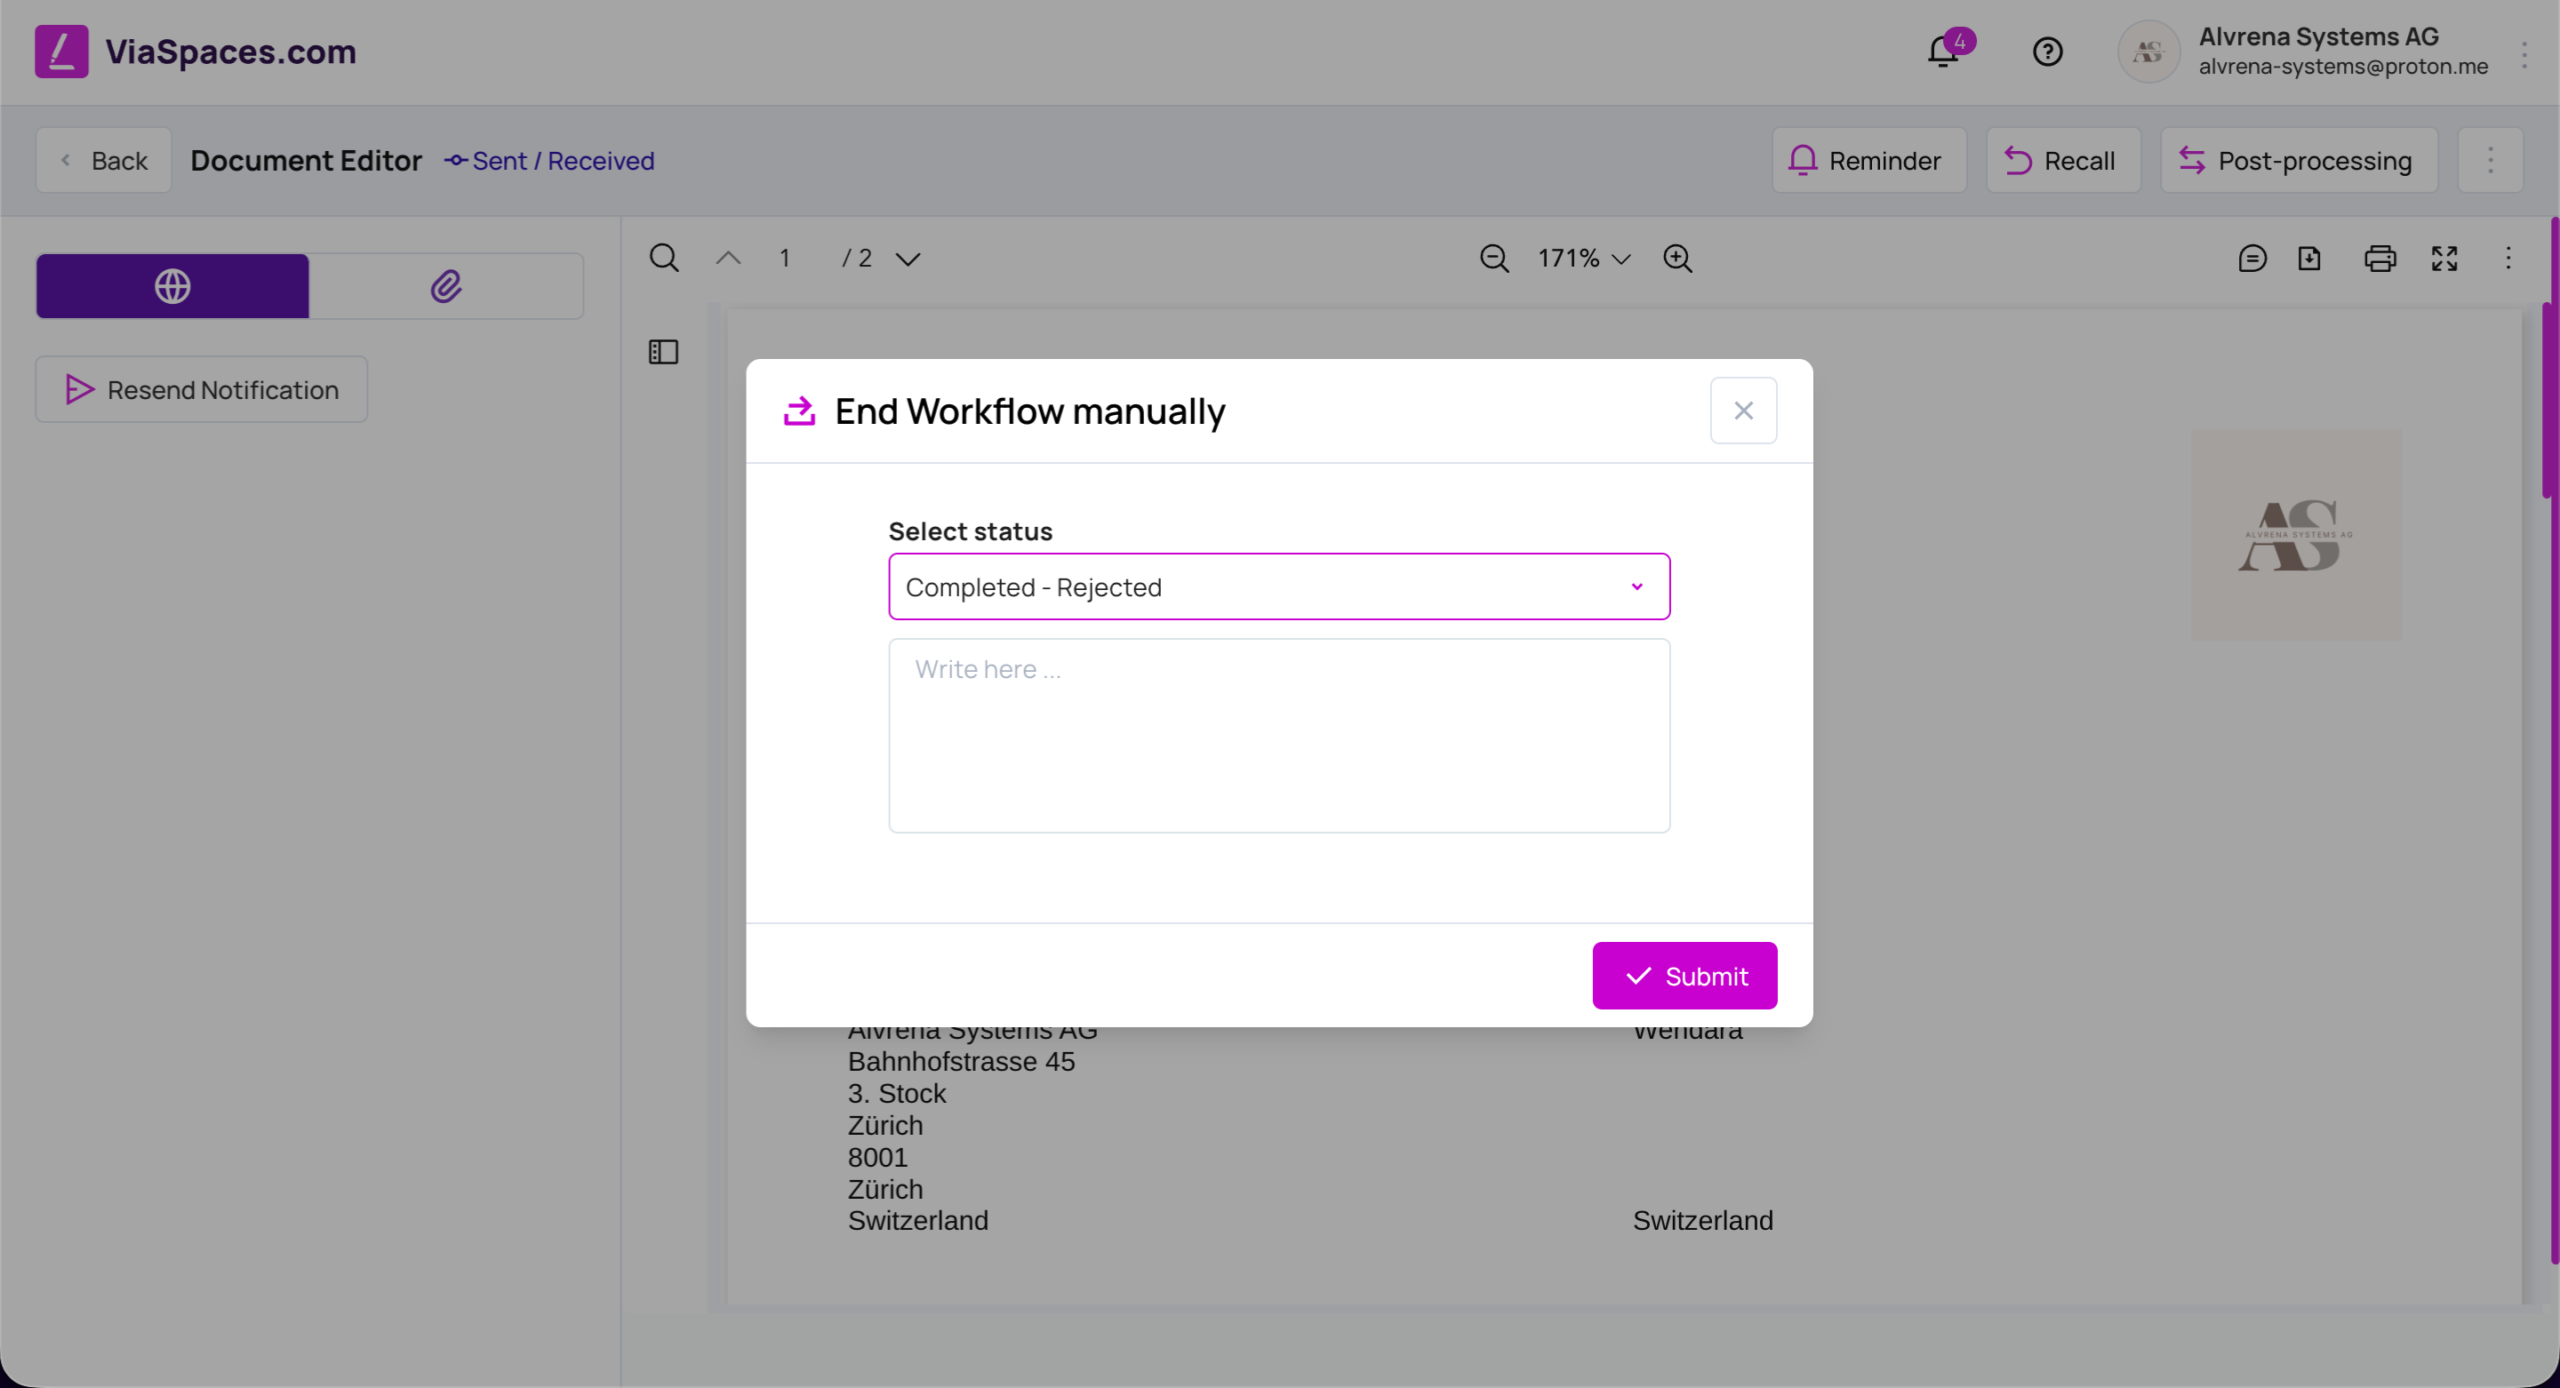
Odosielateľ môže dokument manuálne uzavrieť pomocou možnosti Manuálne ukončiť pracovný postup v ponuke Viac. Následne vyberie konečný stav – Dokončené Akceptované alebo Dokončené Zamietnuté – a pridá komentár.
Spôsoby doručenia #
Doručenie dokumentu určuje spôsob, akým sa dokument doručí obchodnému partnerovi:
- ViaSpaces.com — dokument sa doručí v rámci platformy prepojenému obchodnému partnerovi.
- Podpis osobne — dokument sa podpíše osobne.
- Offline — dokument sa spracuje mimo platformy.
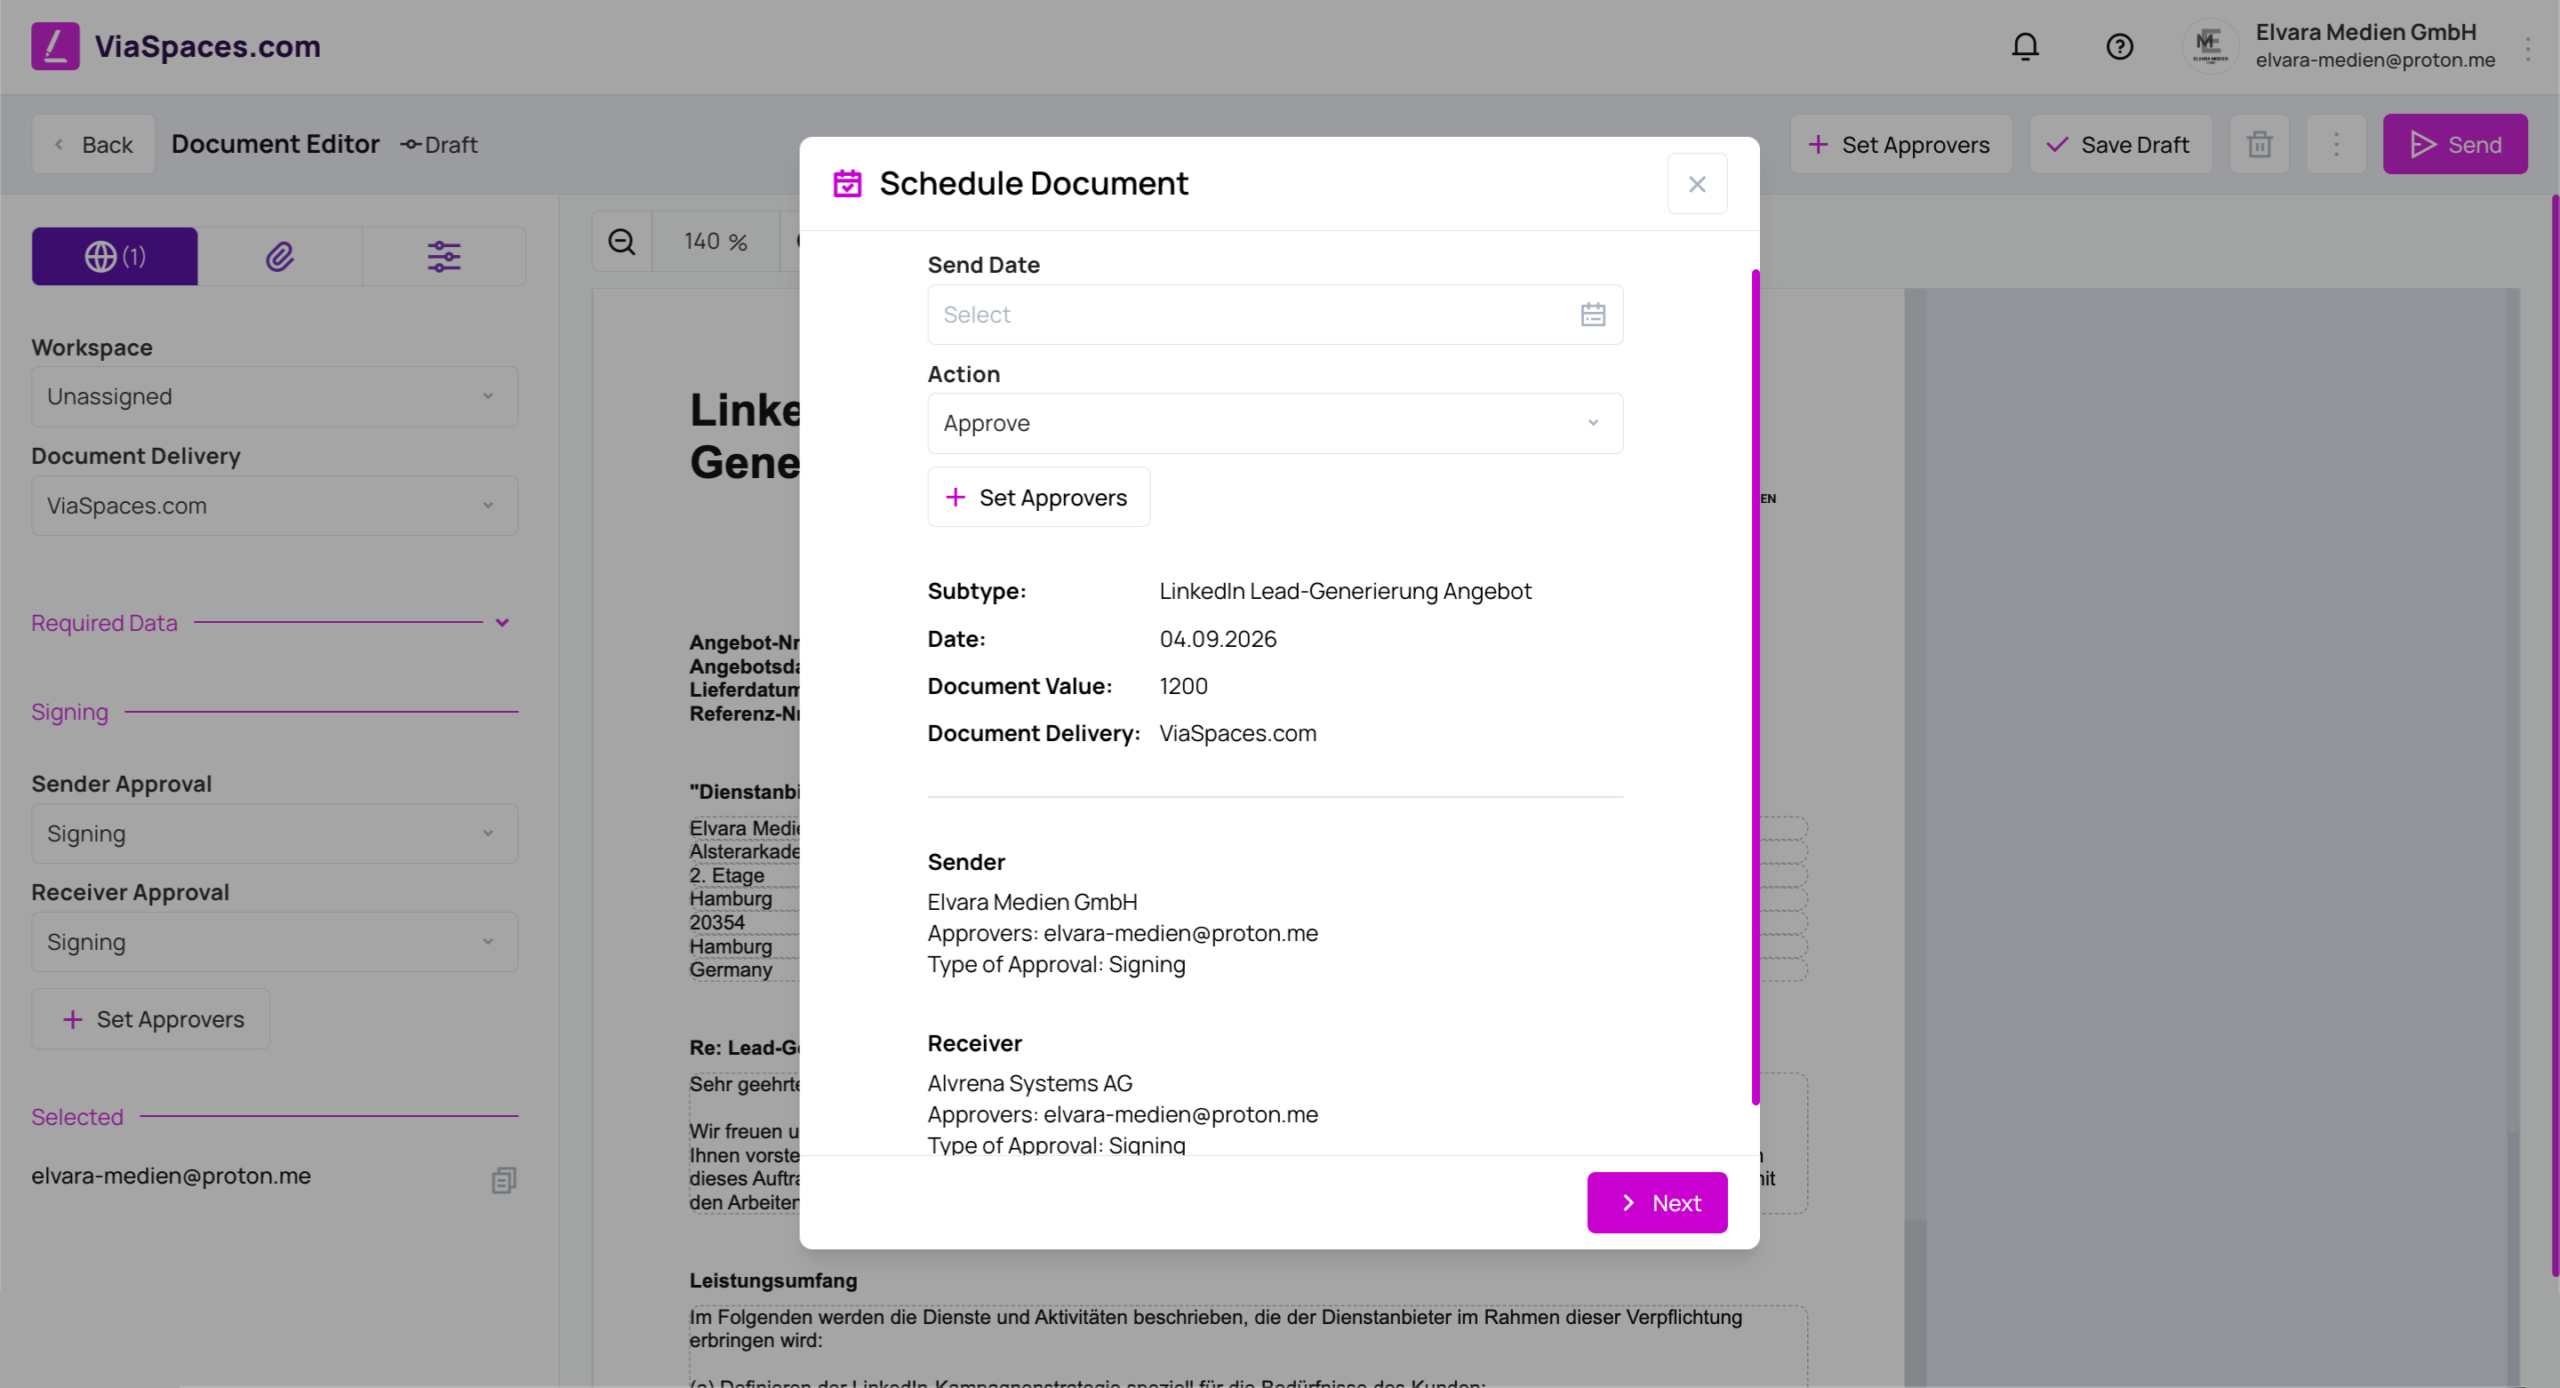
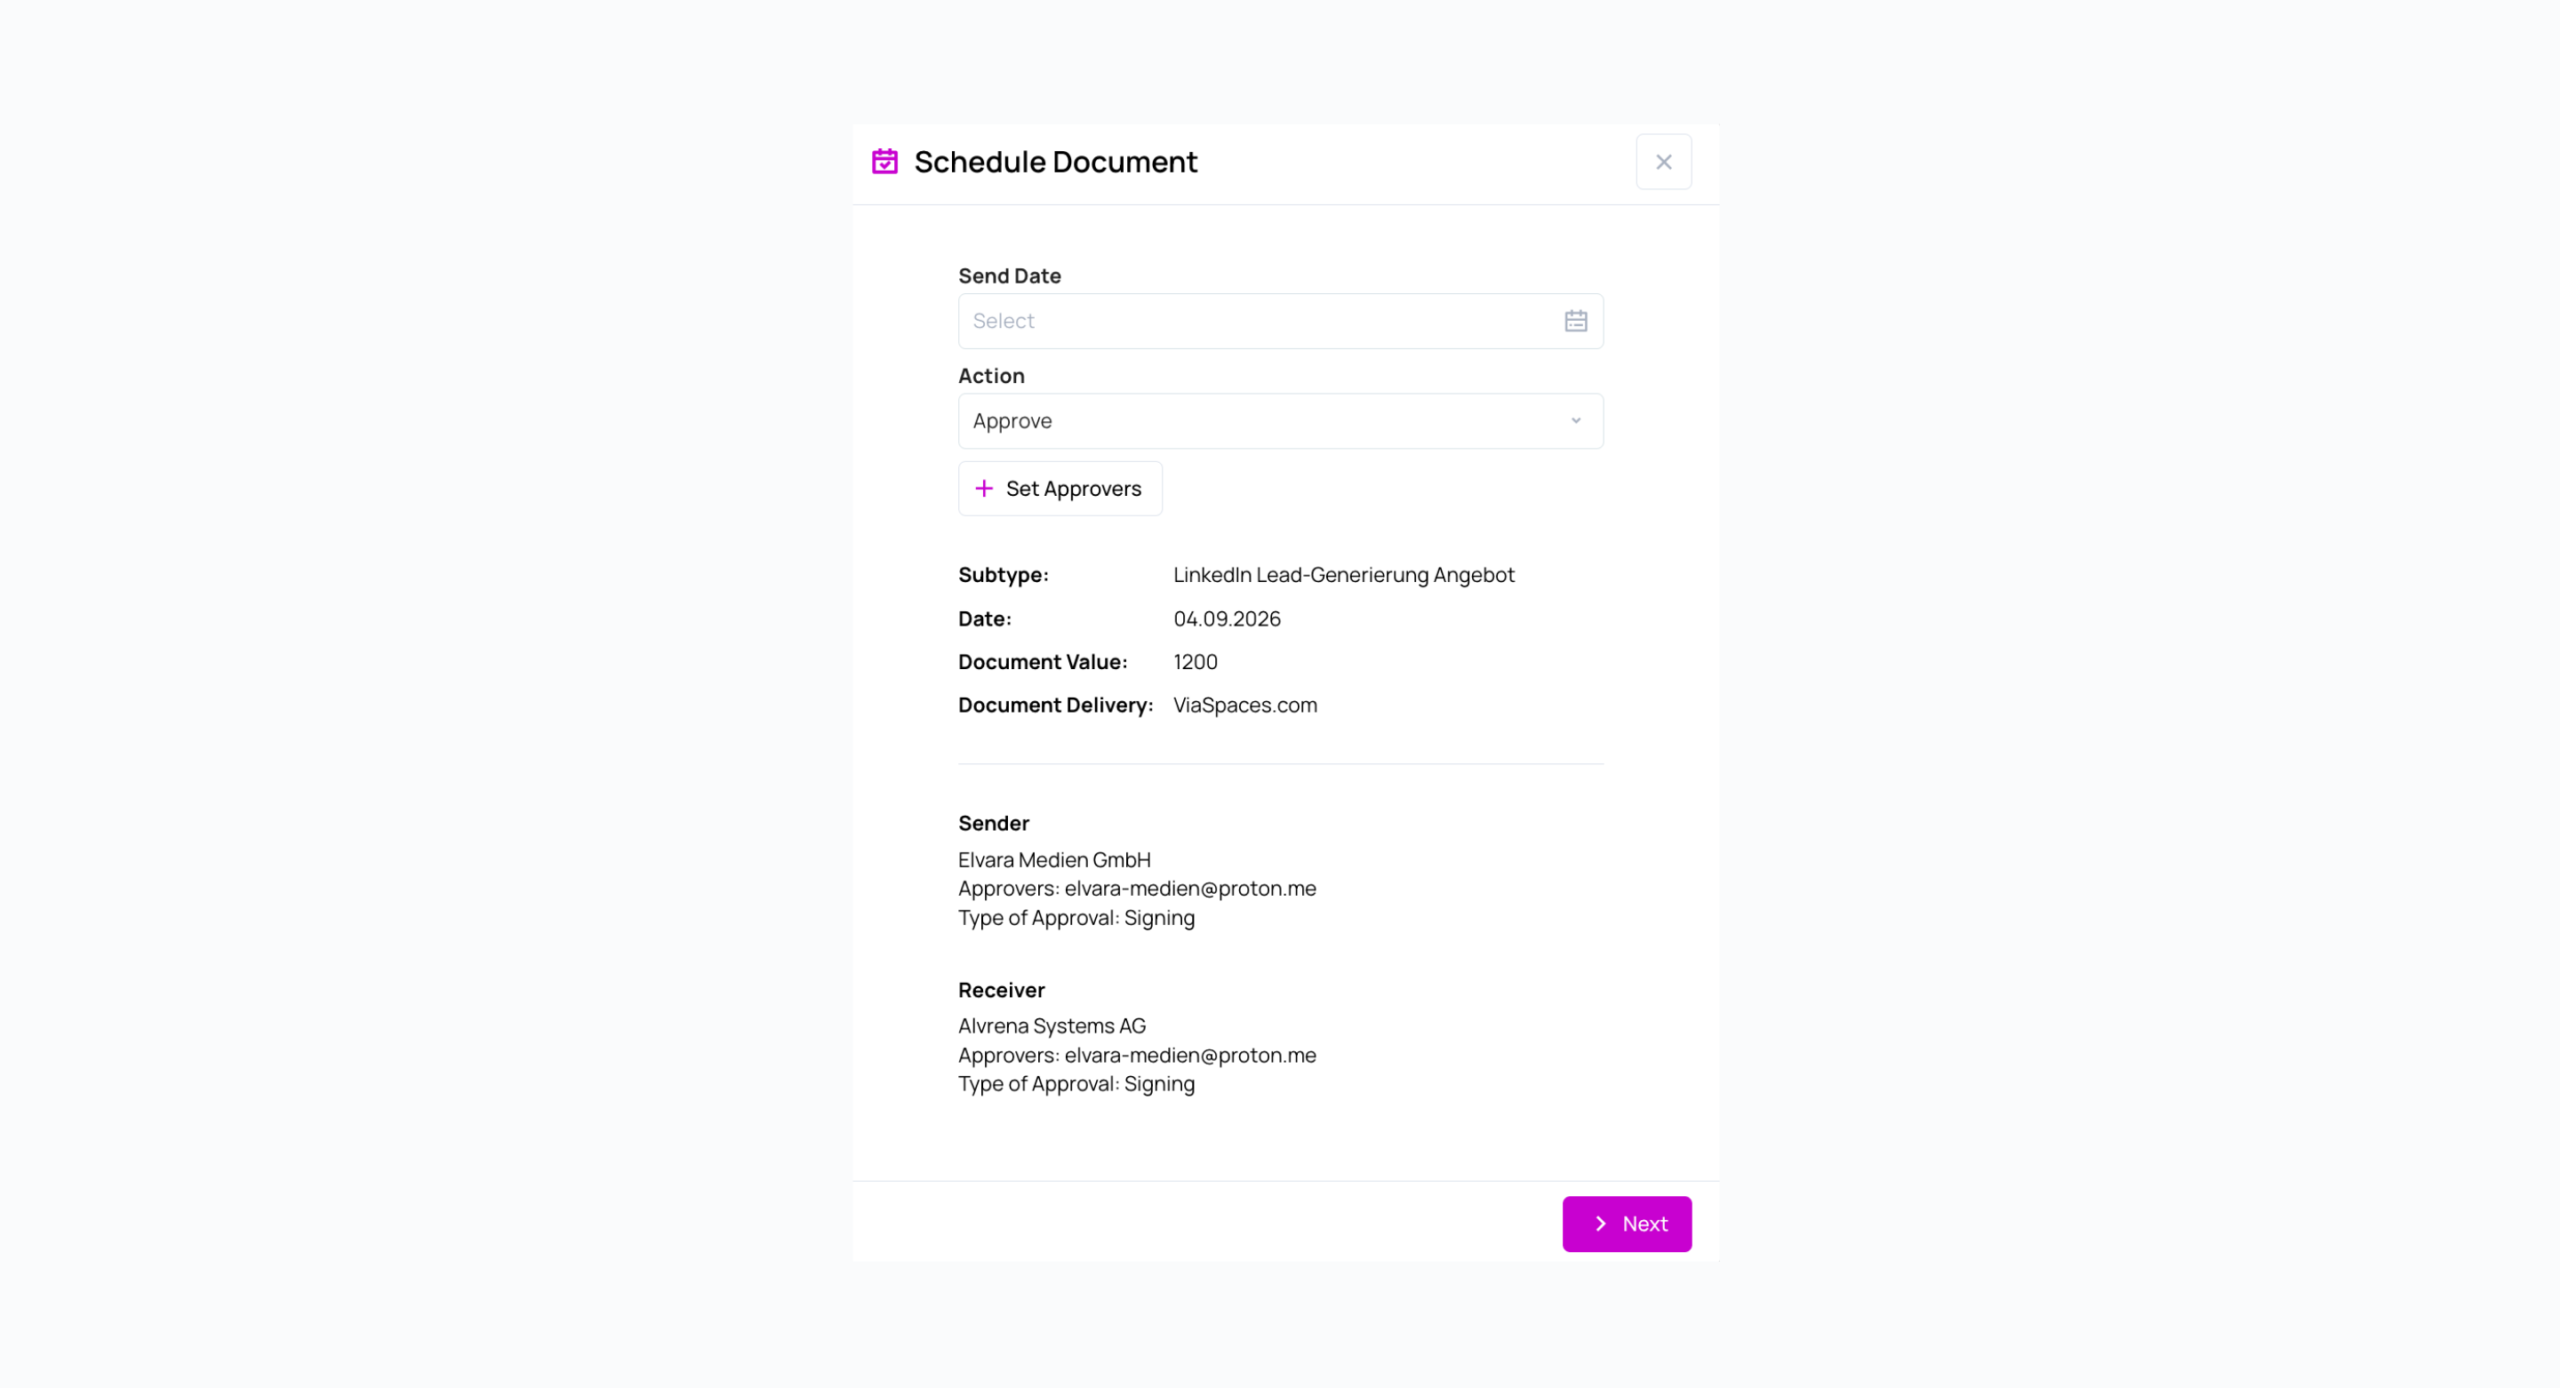
Dokument je možné aj naplánovať. Pomocou možnosti Naplánovať dokument v ponuke Viac nastavíte Dátum odoslania a Akciu – Odoslať alebo Schváliť.
Poznámka: Pri naplánovaní priameho odoslania sa schvaľovatelia odstránia a dokument sa vo zvolený dátum odošle priamo príjemcovi.
Stavy dokumentov #
Dokument prechádza pevne definovaným súborom stavov, ktoré sa zobrazujú v hornej časti Editora dokumentov.
| Stav | Význam |
|---|---|
| Koncept | Vytvorené a uložené, zatiaľ neodoslané. |
| Odoslané / Prijaté | Odoslané odosielateľom a prijaté obchodným partnerom. |
| Schvaľovanie | Čaká na rozhodnutie schvaľovateľov. |
| Dokončené | Akceptované | Všetky schválenia boli udelené. |
| Dokončené | Zamietnuté | Zamietnuté schvaľovateľom alebo ukončené so stavom „Zamietnuté“. |
| Dokončené | Zamietnuté | Zamietnuté schvaľovateľom alebo ukončené so stavom „Zamietnuté“. |
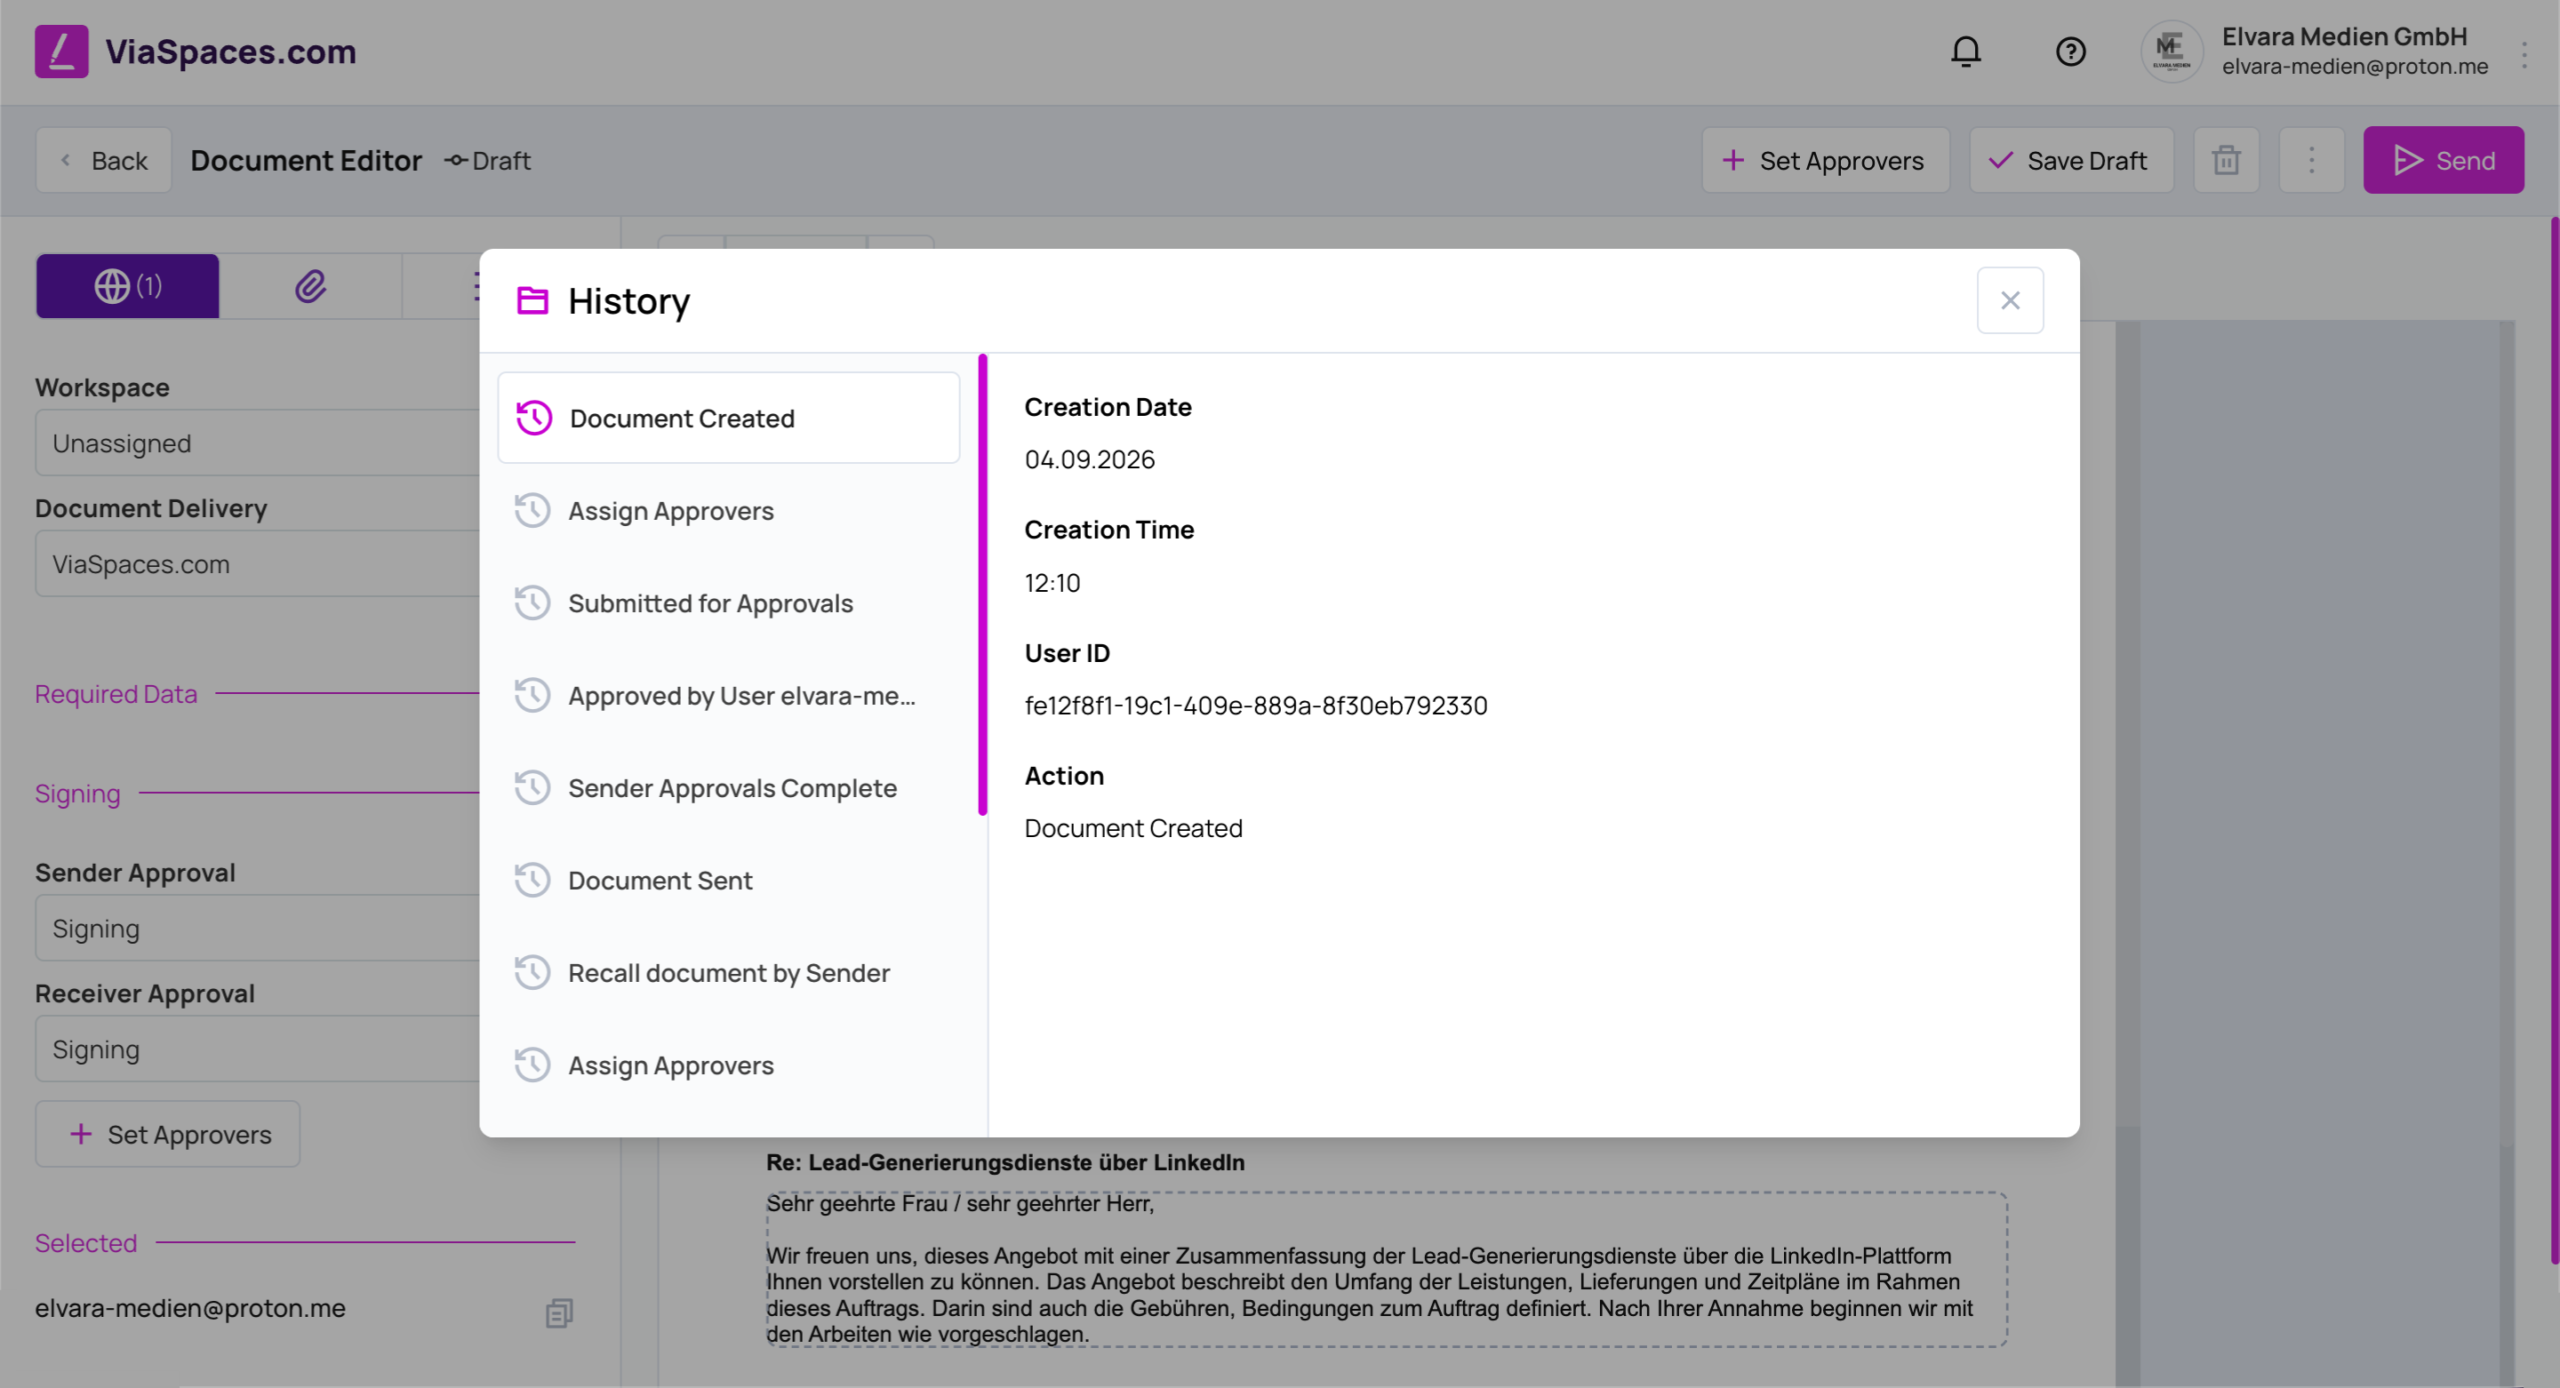
História zaznamenáva každú akciu spolu s dátumom, časom, používateľom a typom akcie, čím vytvára audit trail.
Poznámka: Pri formulárovom dokumente sa počas vypĺňania polí príjemcom pridáva stav Odpoveď. Ďalšie informácie nájdete na stránke Formuláre.
Prijatie dokumentu #
Prijatý dokument sa otvára v rovnakom Editore dokumentov ako odoslaný dokument, avšak v inom stave a so zjednodušeným ľavým panelom. Príjemca dokument skontroluje a podľa spôsobu schválenia nastaveného odosielateľom zvolí Schváliť alebo Zamietnuť. Čakajúce prichádzajúce dokumenty sa zobrazujú na domovskej stránke.
Akcie odosielateľa #
Odosielateľ má v paneli nástrojov a v ponukách Viac a Následné spracovanie k dispozícii nasledujúce akcie:
- Uložiť koncept — uloží dokument bez jeho odoslania.
- Odstrániť koncept — odstráni koncept.
- Kopírovať — vytvorí jednu kópiu dokumentu.
- Odvolať — vráti odoslaný dokument pred jeho schválením späť do stavu Koncept.
- Pripomienka — nastaví pripomienku s predmetom, komentármi, používateľmi, ktorým je určená, a termínom.
- Hromadné kopírovanie — vytvorí sériu kópií dokumentu podľa nastaveného harmonogramu.
Poznámka: Odvolanie, odstránenie, export a celý proces hromadného kopírovania sú podrobnejšie opísané na stránke Ďalšie funkcie.