
V tomto dokumente pomocníka sa dozviete, ako sa orientovať v prostredí ViaSpaces – od rozloženia používateľského rozhrania cez rýchle akcie a notifikácie až po domovskú stránku, Dashboard a filtre.
Používateľské rozhranie má v rámci celého účtu jednotné usporiadanie: naľavo sa nachádza bočný panel, v hornej časti hlavička a v strede pracovná plocha. Táto stránka vysvetľuje, kde sa jednotlivé funkcie nachádzajú a ako rýchlo vyhľadať dokumenty.
Rozloženie používateľského rozhrania #
Hlavička sa nachádza v hornej časti rozhrania a obsahuje ikonu notifikácií, tlačidlo Pomocník, názov účtu s používateľskou ponukou a počítadlo odchádzajúcich transakcií. To zobrazuje, koľko transakcií zahrnutých v predplatnom už bolo využitých, takže môžete rýchlo zistiť, koľko ich ešte zostáva pred začatím účtovania ďalších transakcií.
Bočný panel na ľavej strane obsahuje hlavné sekcie: Domov, Dashboardy, Pripomienky, Obchodní partneri, Pracovné priestory, Základné údaje, Šablóny, Nastavenia, Účtovníctvo a Kôš. V hornej časti sa nachádza Nové a v spodnej časti Odoslať spätnú väzbu. Ovládací prvok na zbalenie zúži bočný panel iba na ikony, čím uvoľní viac priestoru na obrazovke pri práci so širokým dokumentom.
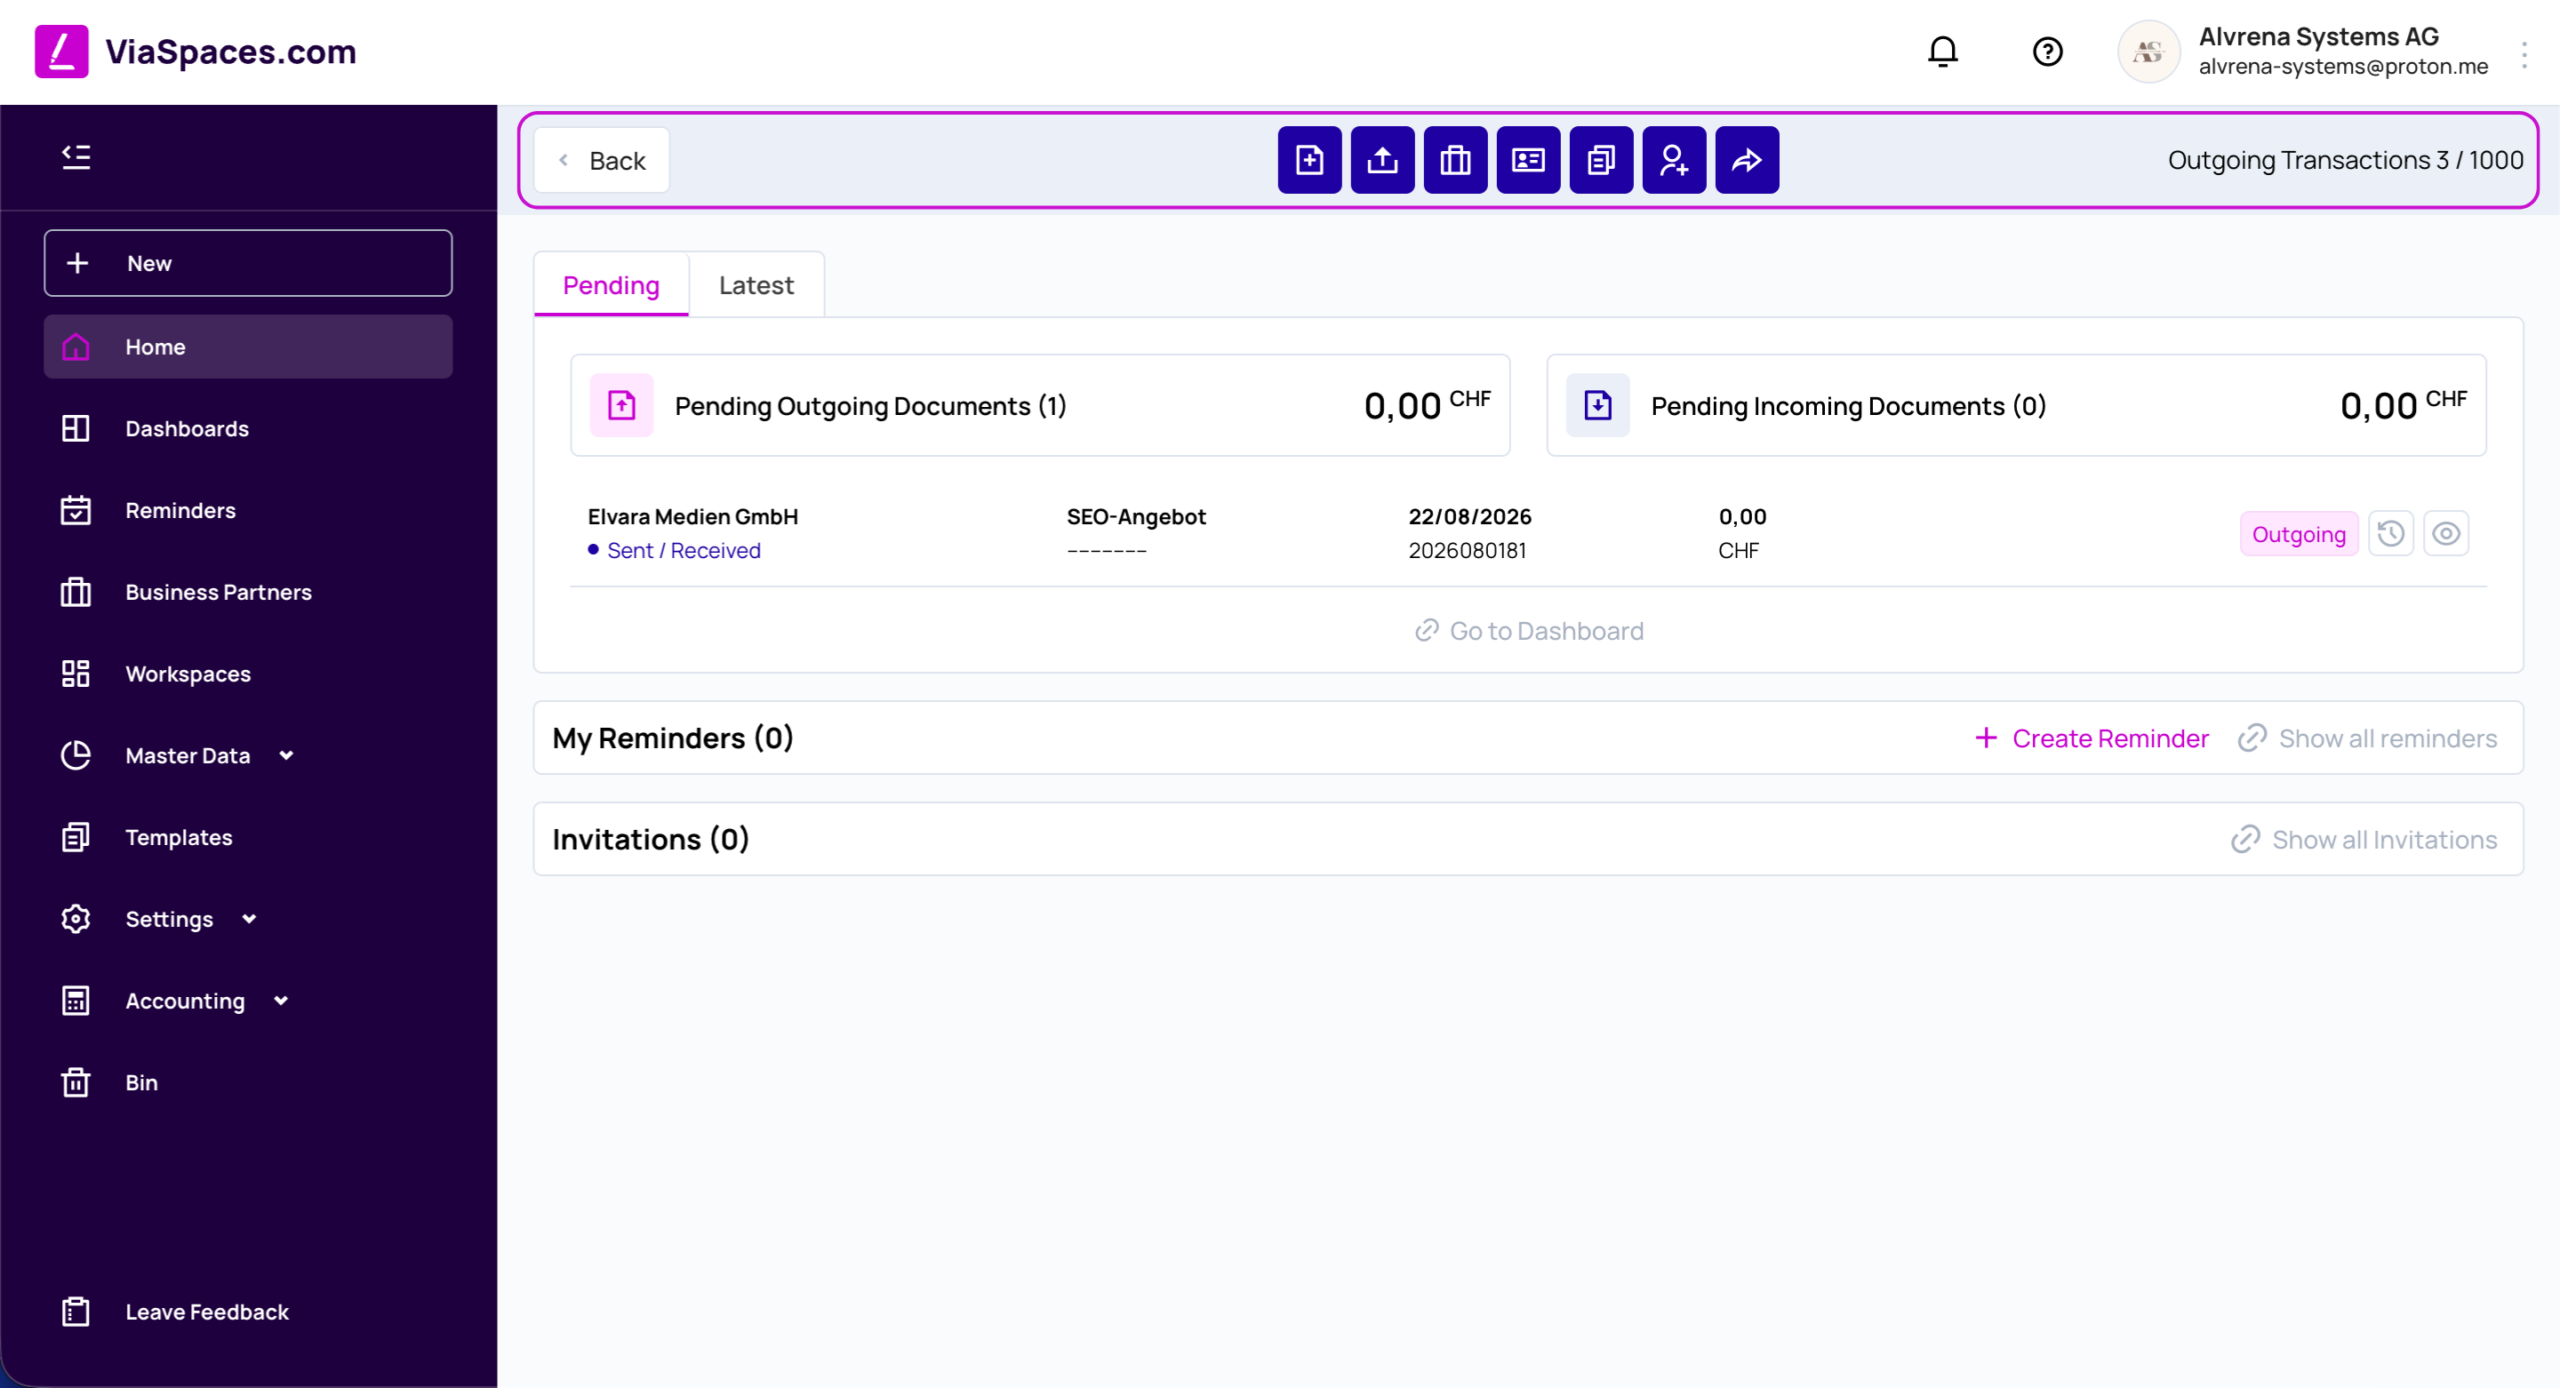
V hornej časti pracovnej plochy sa nachádza rad ikon rýchlych akcií pre najčastejšie používané úlohy. Bežné akcie sú tak dostupné jedným kliknutím z ľubovoľnej obrazovky.
Rýchle akcie #
Ikony rýchlych akcií umožňujú priamo otvoriť najčastejšie používané funkcie bez potreby prechádzať cez ponuky:
- Nový dokument — otvorí možnosť „Vytvoriť nový dokument“, kde môžete vytvoriť dokument zo šablóny.
- Nahrať dokument — otvorí možnosť „Nahrať dokument“, ktorá umožňuje importovať externé súbory.
- Pridať obchodného partnera — otvorí dialóg na pridanie obchodného partnera.
- Odoslať vizitku — otvorí pozvánku na nadviazanie spojenia s obchodným partnerom.
- Šablóny — otvorí stránku „Šablóny“.
- Pridať nového používateľa — otvorí pozvánku pre používateľa.
- Zdieľať registračný odkaz — zdieľa registračný odkaz ViaSpaces, prostredníctvom ktorého môžete pozvať partnera, ktorý platformu ešte nepoužíva.
Prepínanie medzi účtami #
Používateľská ponuka v pravom hornom rohu umožňuje návrat do sekcie Moje účty, kde môžete prepnúť na iný účet bez odhlásenia. Takto môžete počas dňa jednoducho prechádzať medzi viacerými účtami – napríklad z firemného účtu na osobný – pričom údaje, dokumenty a nastavenia zostávajú pre každý účet oddelené.
Notifikácie #
Ikona zvončeka v hlavičke otvára Notifikácie a zobrazuje počet neprečítaných položiek, aby ste neprehliadli žiadnu akciu, ktorá si vyžaduje pozornosť. Notifikácie sú rozdelené do dvoch kariet: Všetky a Súhrnné reporty pre pravidelné prehľady, napríklad týždenný report. Každá notifikácia zobrazuje odosielateľa, udalosť – napríklad dokument odoslaný na kontrolu alebo akciu vykonanú v dokumente – a časovú pečiatku. Pomocou možnosti Označiť všetko ako prečítané môžete zrušiť stav všetkých neprečítaných položiek. Ktoré udalosti vytvoria notifikáciu a cez ktorý kanál sa doručia, nastavíte v časti Nastavenia, Notifikácie.
Pomocník a sprievodca #
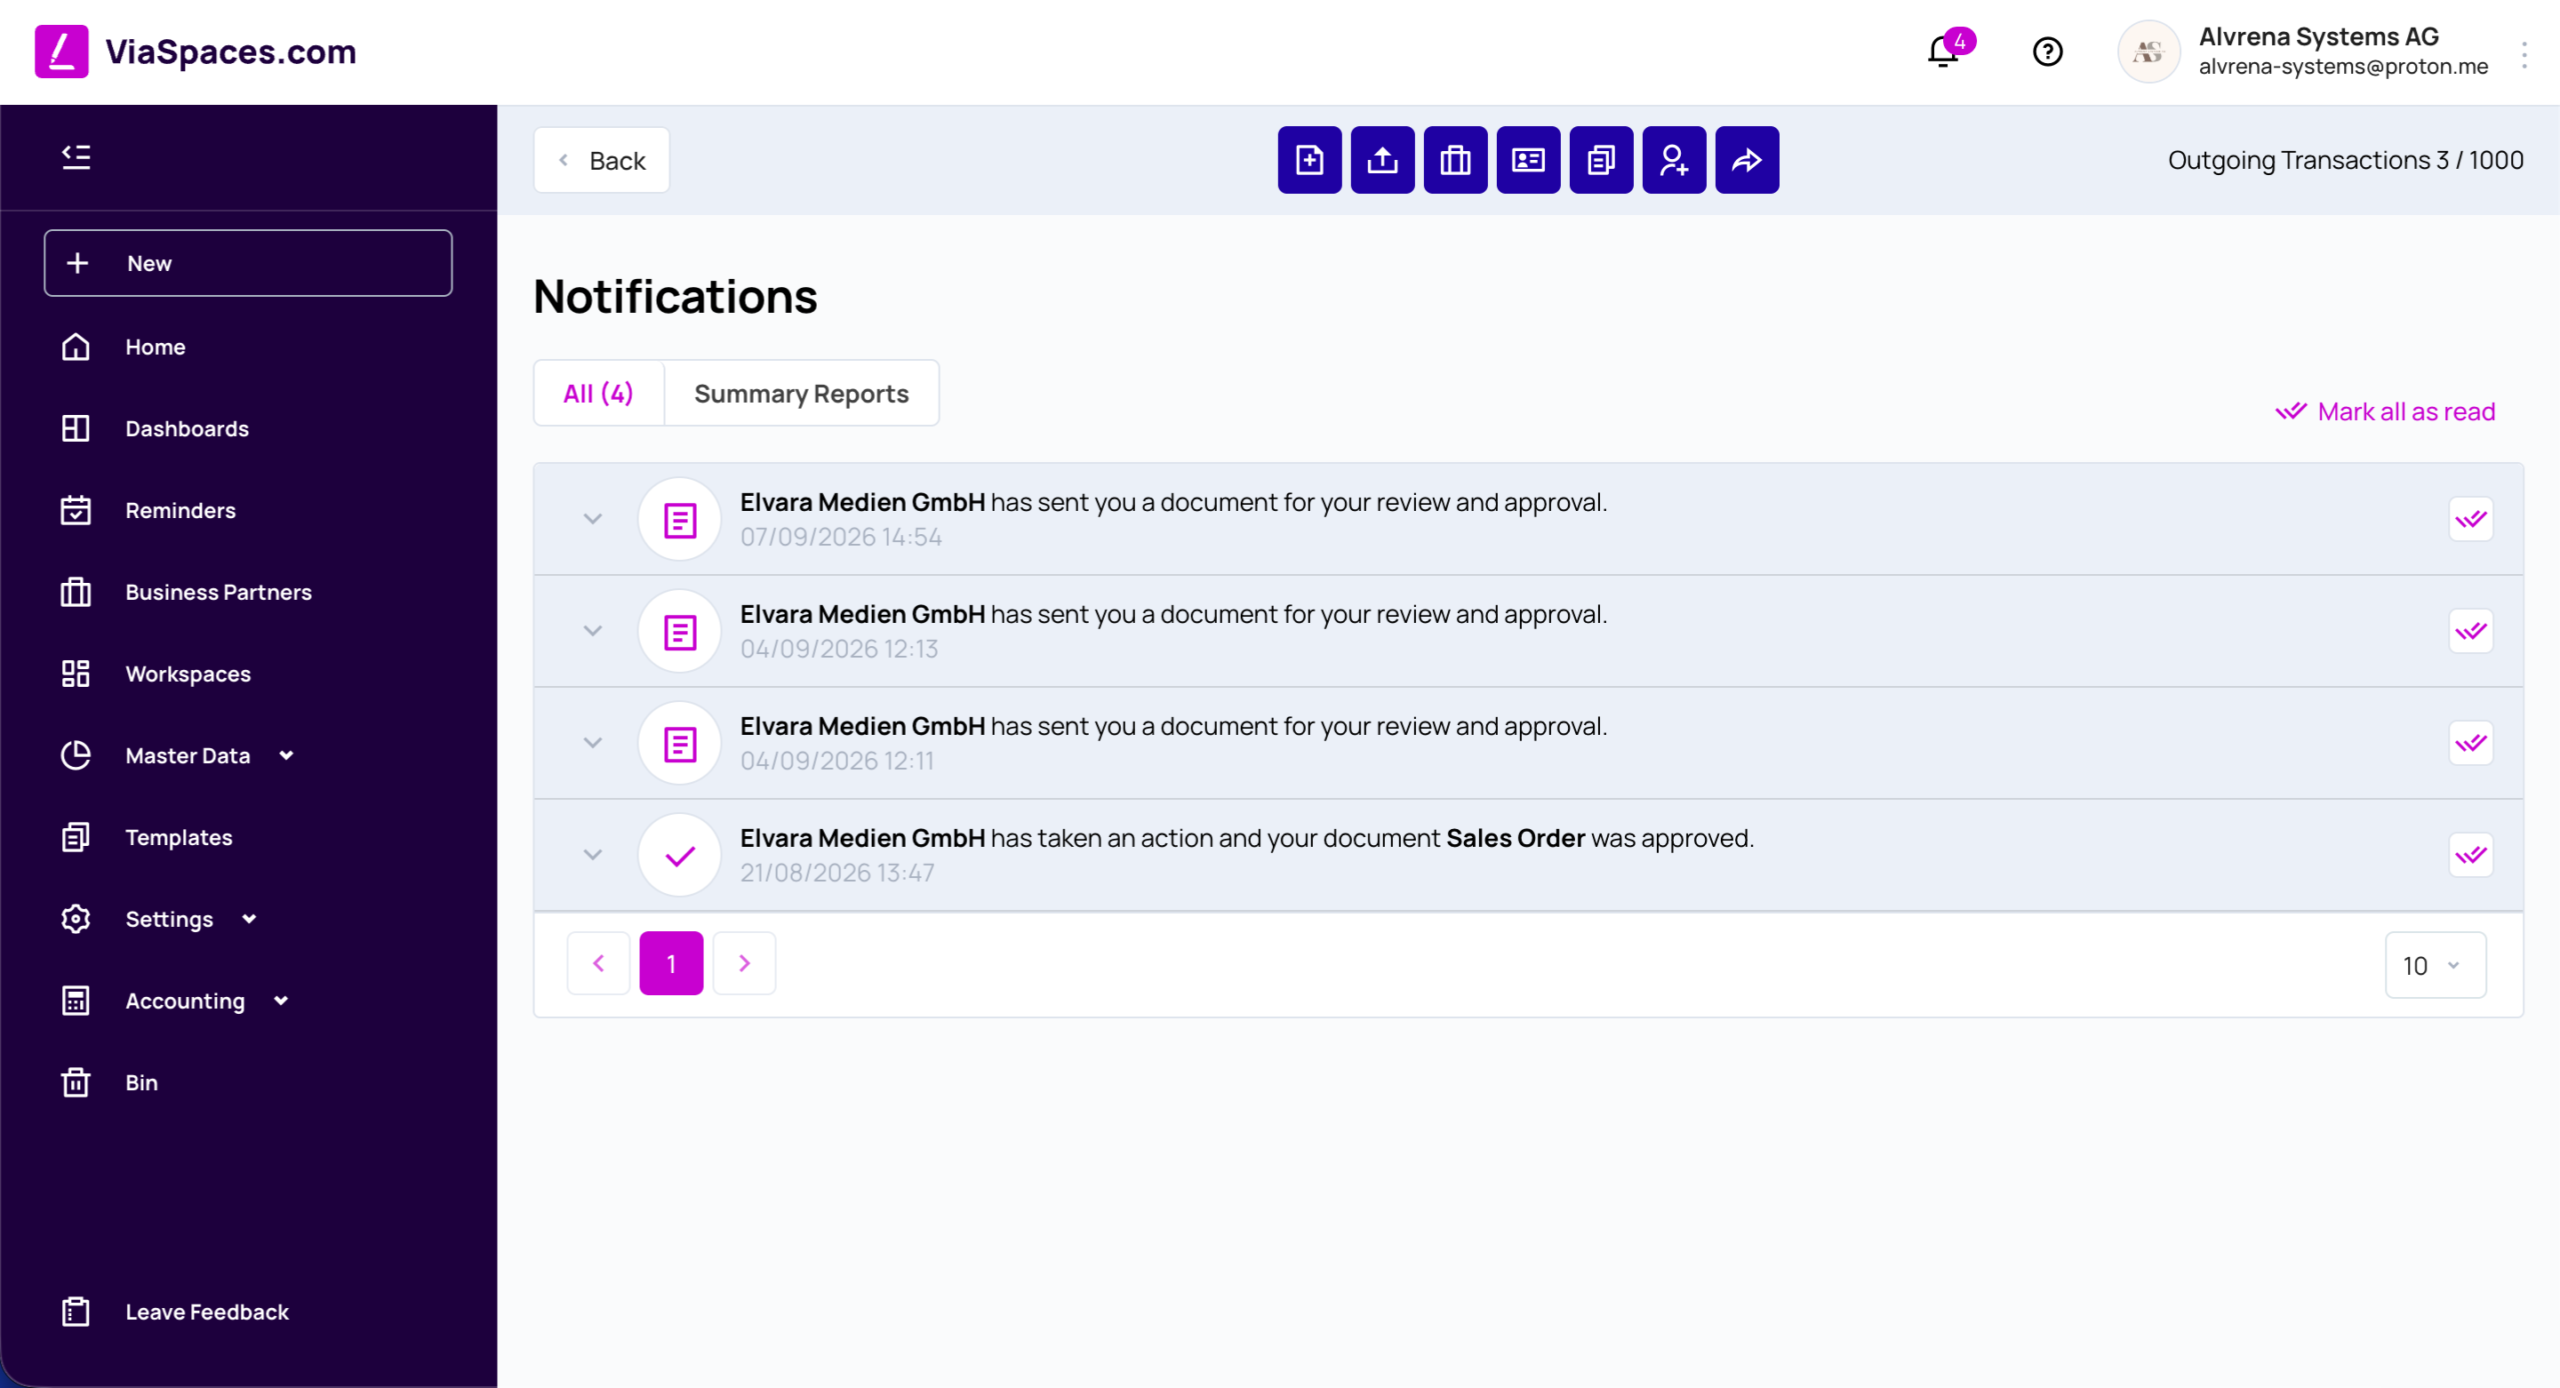
Tlačidlo Pomocník otvorí Sprievodcu, ktorý slúži ako podpora pri menej známych úlohách. Obsahuje vyhľadávanie, sekciu Preskúmať všetky návody s krátkymi postupmi (napríklad Pridať bankový účet alebo Pridať obchodného partnera) a odkazy na Odoslať spätnú väzbu, Dokumentáciu a Kontaktovať podporu. Návod môže prebiehať ako interaktívny postup krok za krokom, ktorý priamo zvýrazňuje príslušné ovládacie prvky na obrazovke a prevedie nového používateľa úlohou pri jej prvom vykonaní.
Domovská obrazovka #
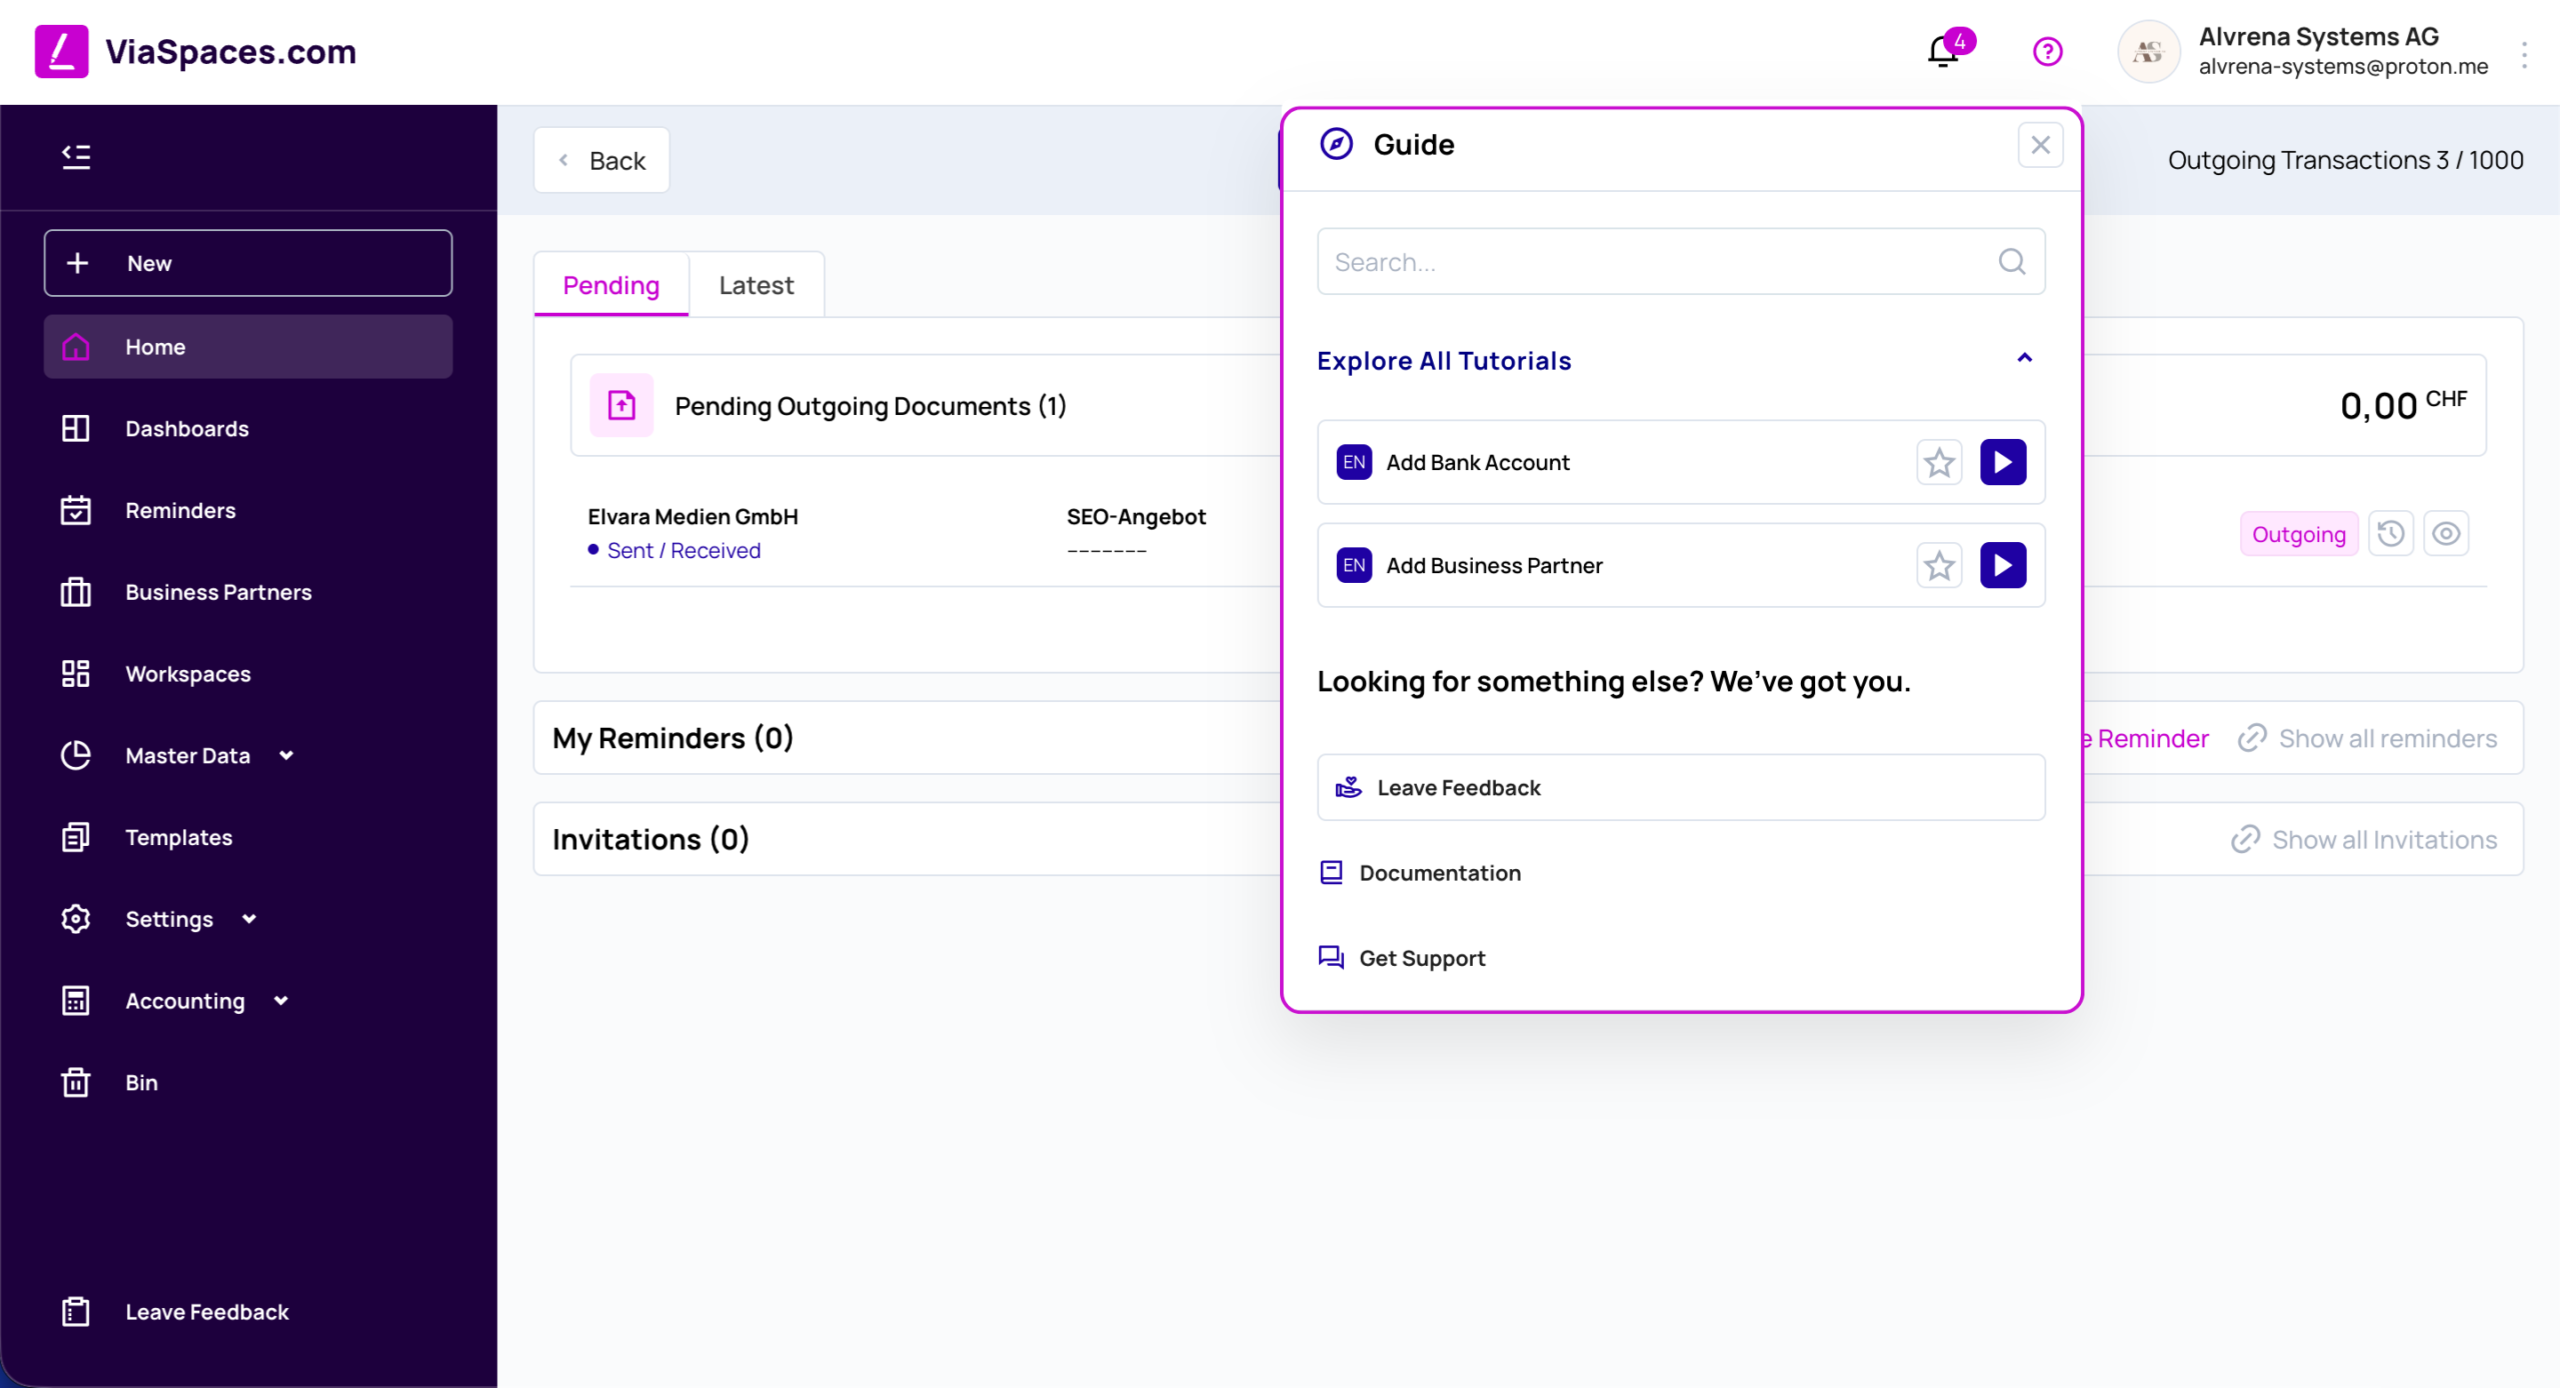
Domovská obrazovka je východiskovým bodom po otvorení účtu a poskytuje prehľad o úlohách, ktoré si aktuálne vyžadujú pozornosť. Zobrazuje Čakajúce odchádzajúce dokumenty a Čakajúce prichádzajúce dokumenty spolu s ich počtom a celkovou hodnotou, ako aj Moje pripomienky a Pozvánky. Pomocou možnosti Prejsť na Dashboard otvoríte úplný prehľad dokumentov, ak potrebujete pracovať aj s dokumentmi nad rámec aktuálne čakajúcich úloh.
Dashboard #
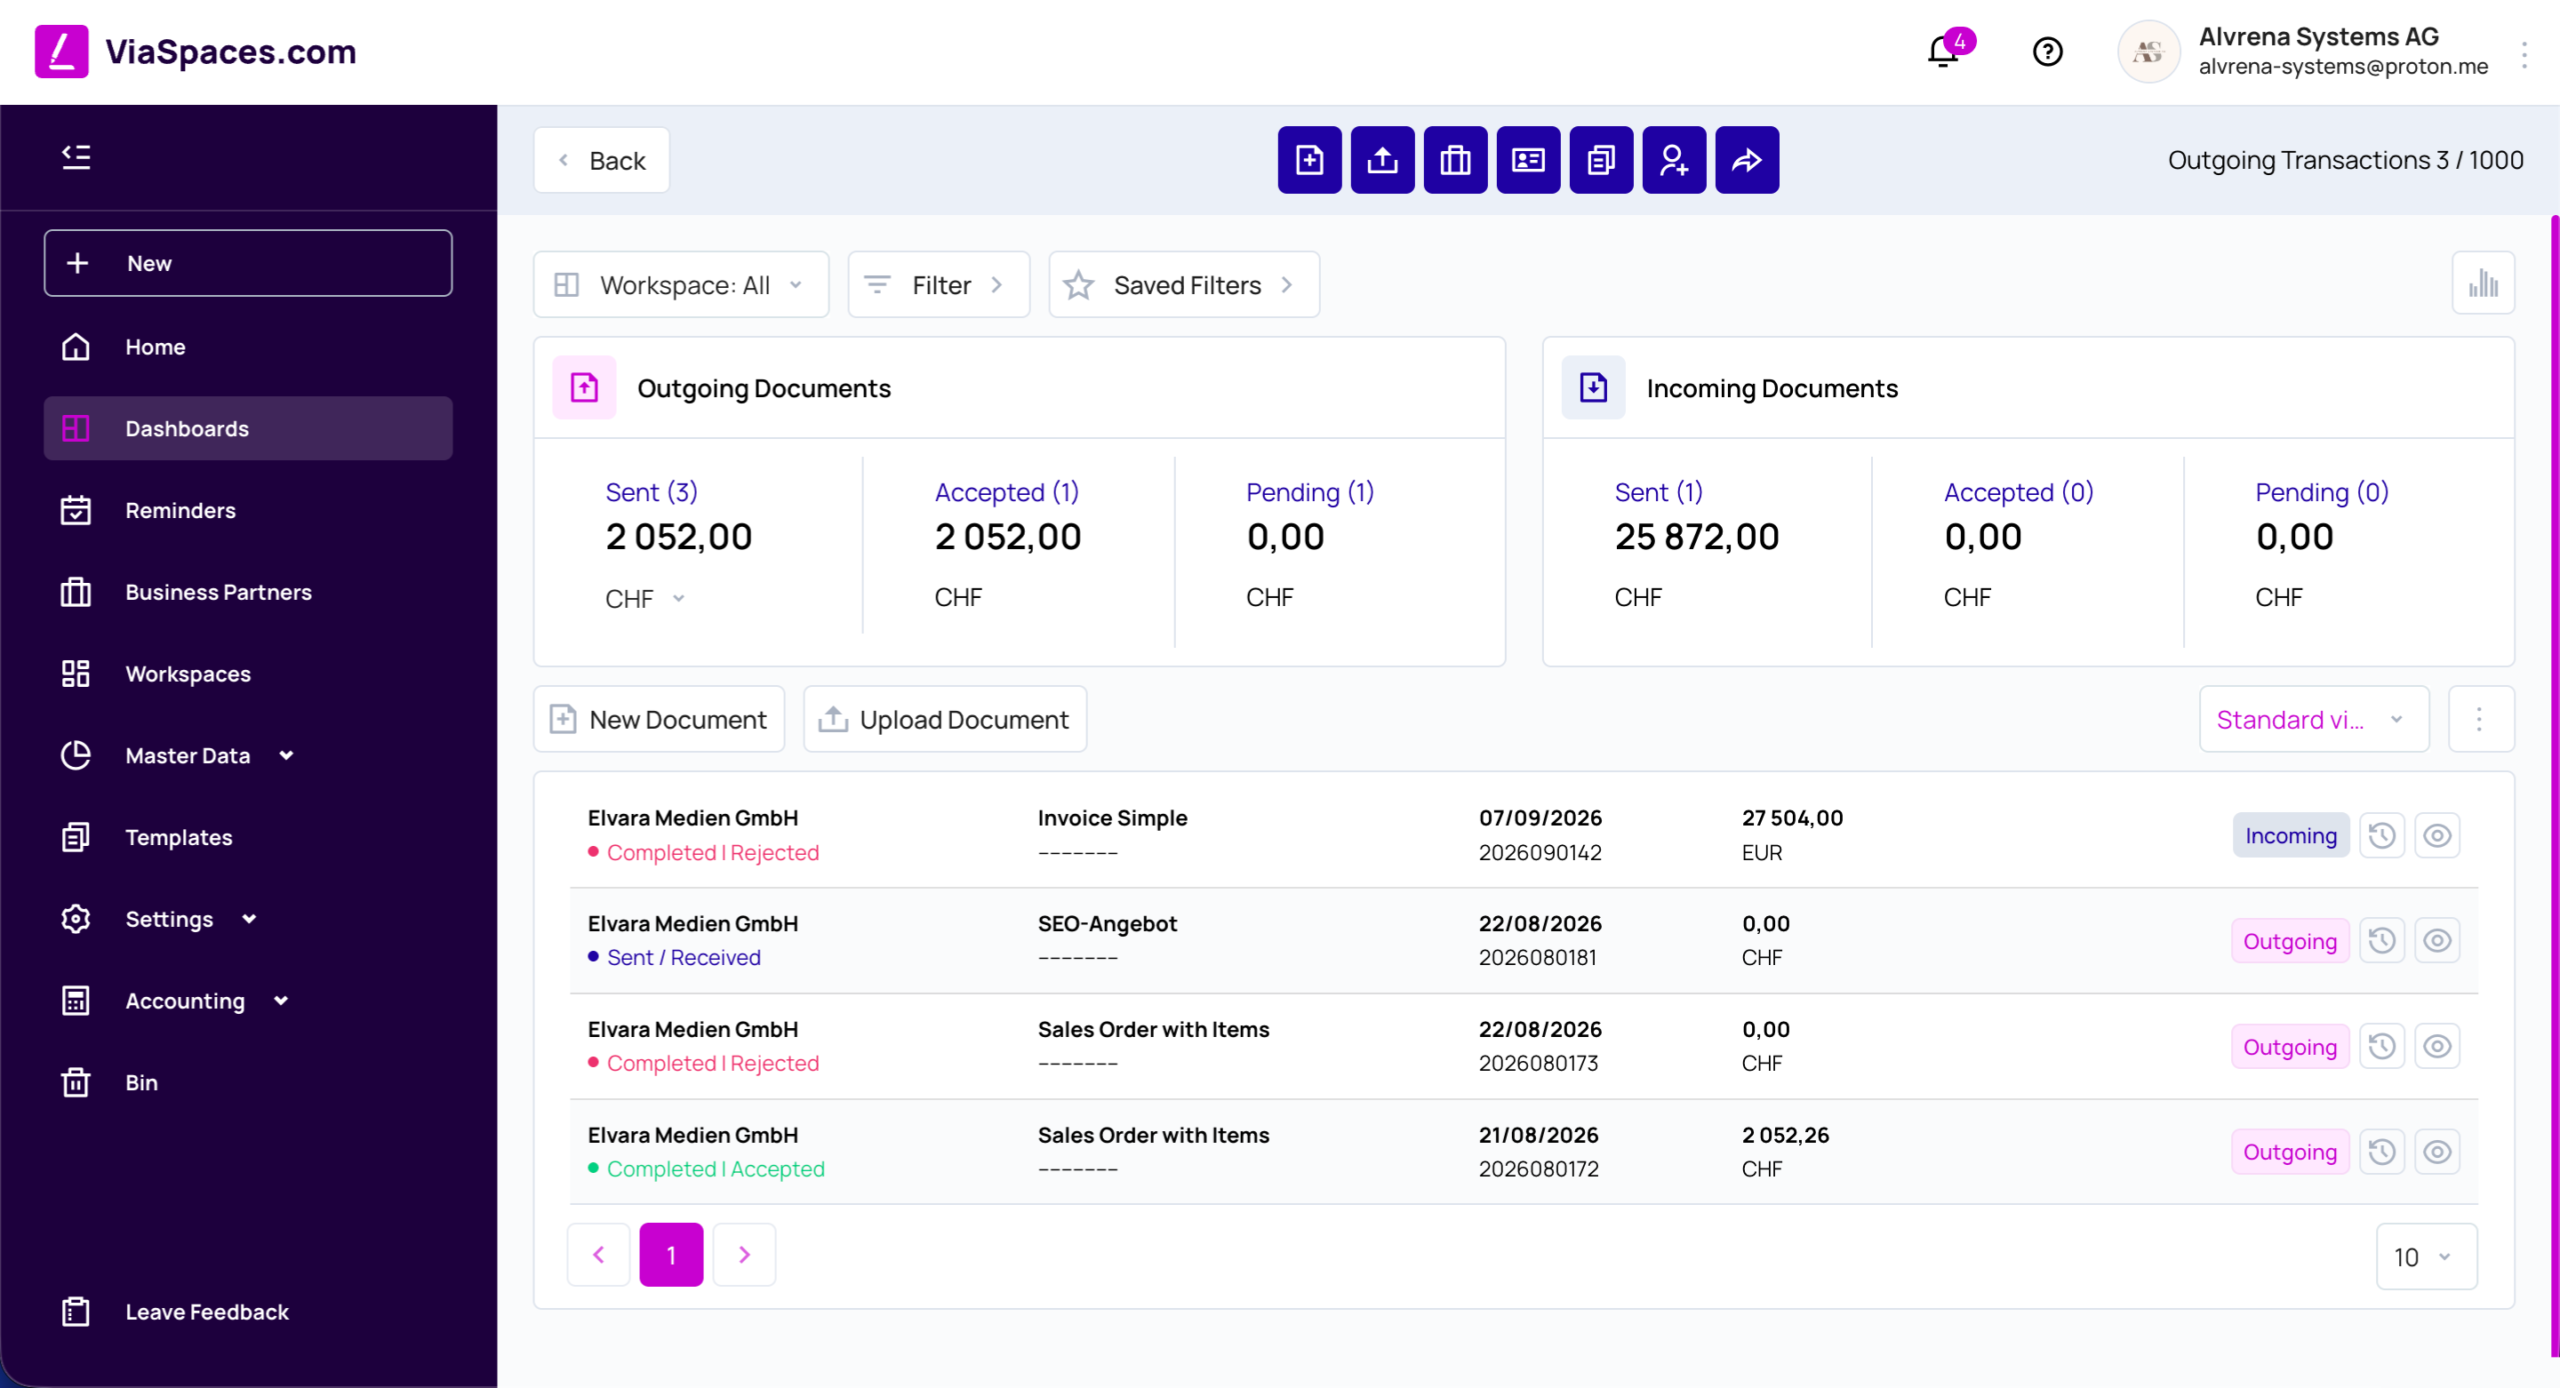
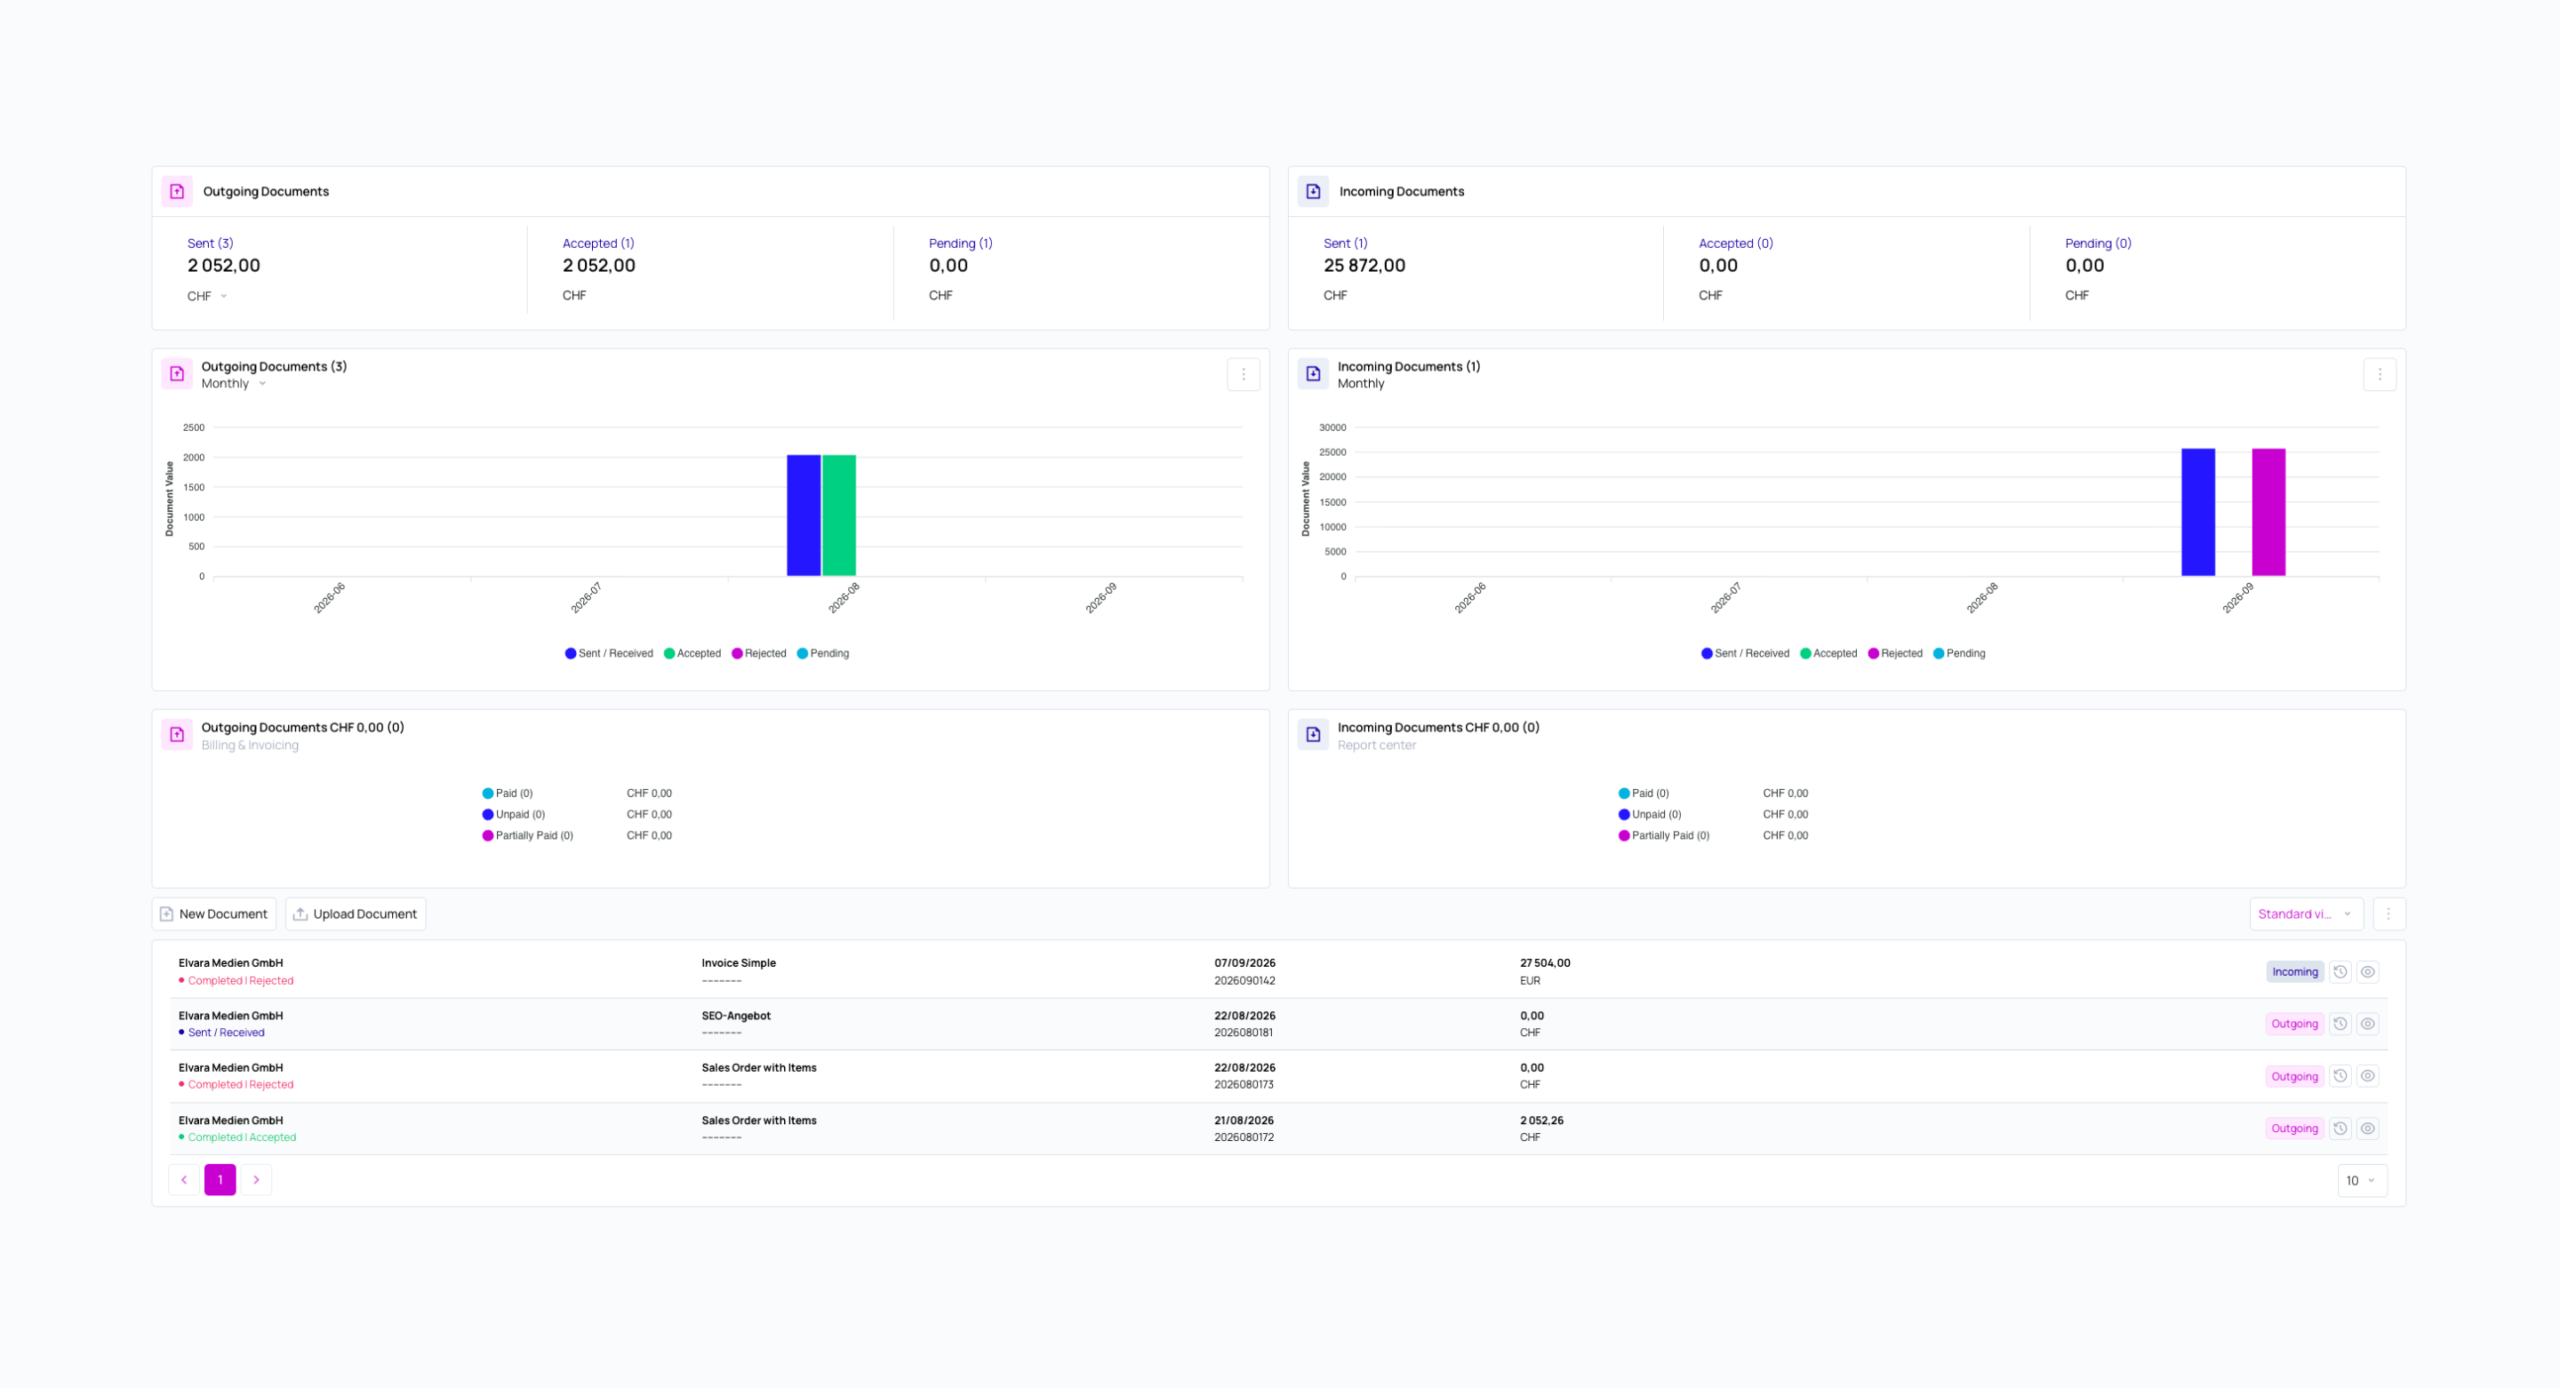
Dashboard, ktorý otvoríte cez Dashboardy, obsahuje všetky dokumenty v účte spolu s prehľadovými ukazovateľmi, grafmi a zoznamom dokumentov. Predstavuje hlavné miesto na sledovanie toku dokumentov a rýchle vyhľadanie konkrétneho dokumentu.
Ovládacie prvky nad Dashboardom zahŕňajú Pracovný priestor (obmedzí zobrazenie na konkrétny pracovný priestor, takže tím vidí iba svoje dokumenty), Filter, Uložené filtre, Obnoviť filter a prepínač na zobrazenie alebo skrytie grafov.
Počítadlá. Widgety Odchádzajúce dokumenty a Prichádzajúce dokumenty zobrazujú počet dokumentov podľa stavu – Odoslané, Akceptované a Čakajúce – spolu s celkovou hodnotou pre každý stav. Poskytujú tak rýchly prehľad o tom, čo už bolo odsúhlasené a čo ešte čaká na spracovanie. Hodnoty sa zobrazujú v predvolenej mene účtu nastavenej v časti Nastavenia. Sumy v iných menách sa na túto menu prepočítajú, takže aj účet s viacerými menami zobrazuje jednotný celkový súčet. Pomocou výberu meny môžete zmeniť menu zobrazenia.
Platobné widgety sumarizujú dokumenty podľa stavu platby – Uhradené, Neuhradené a Čiastočne uhradené – pre odchádzajúce dokumenty (Fakturácia a vystavovanie faktúr) aj prichádzajúce dokumenty (Centrum reportov). Umožňujú tak rýchlo zistiť, ktoré sumy ešte zostávajú neuhradené. Stav platby sa spravuje na stránke Správa stavu platieb.
Grafy. Grafy odchádzajúcich a prichádzajúcich dokumentov zobrazujú vývoj hodnoty dokumentov v čase a obsahujú legendu pre stavy Odoslané / Prijaté, Akceptované, Zamietnuté a Čakajúce. Umožňujú tak rýchlo sledovať vývoj v jednotlivých mesiacoch. Pomocou výberu obdobia môžete zmeniť spôsob zoskupenia údajov, napríklad na mesačné. Ponuka grafu obsahuje možnosti Kopírovať PNG do schránky a Stiahnuť PNG, vďaka čomu môžete graf jednoducho vložiť do reportu alebo správy.
Zoznam dokumentov. Každý riadok zobrazuje stav, obchodného partnera, podtyp, dátum a číslo dokumentu, hodnotu a menu, ako aj smer dokumentu (Prichádzajúci alebo Odchádzajúci). K dispozícii sú aj akcie História a Náhľad. Pomocou možností Nový dokument a Nahrať dokument môžete priamo z tohto miesta vytvoriť alebo nahrať dokument.
Zobrazenia. Pomocou výberu zobrazenia môžete prepínať medzi Štandardným zobrazením, Zobrazením následného spracovania (so stĺpcami a akciami súvisiacimi s platbami) a Zobrazením platnosti (s dátumami platnosti). Vyberte zobrazenie podľa konkrétnej úlohy, napríklad pri sledovaní neuhradených platieb alebo kontrole dátumov vypršania. Zobrazenie následného spracovania a zobrazenie platnosti sú podrobnejšie opísané na stránkach Správa stavu platieb a Správa platnosti a dátumov vypršania.
Filtre #
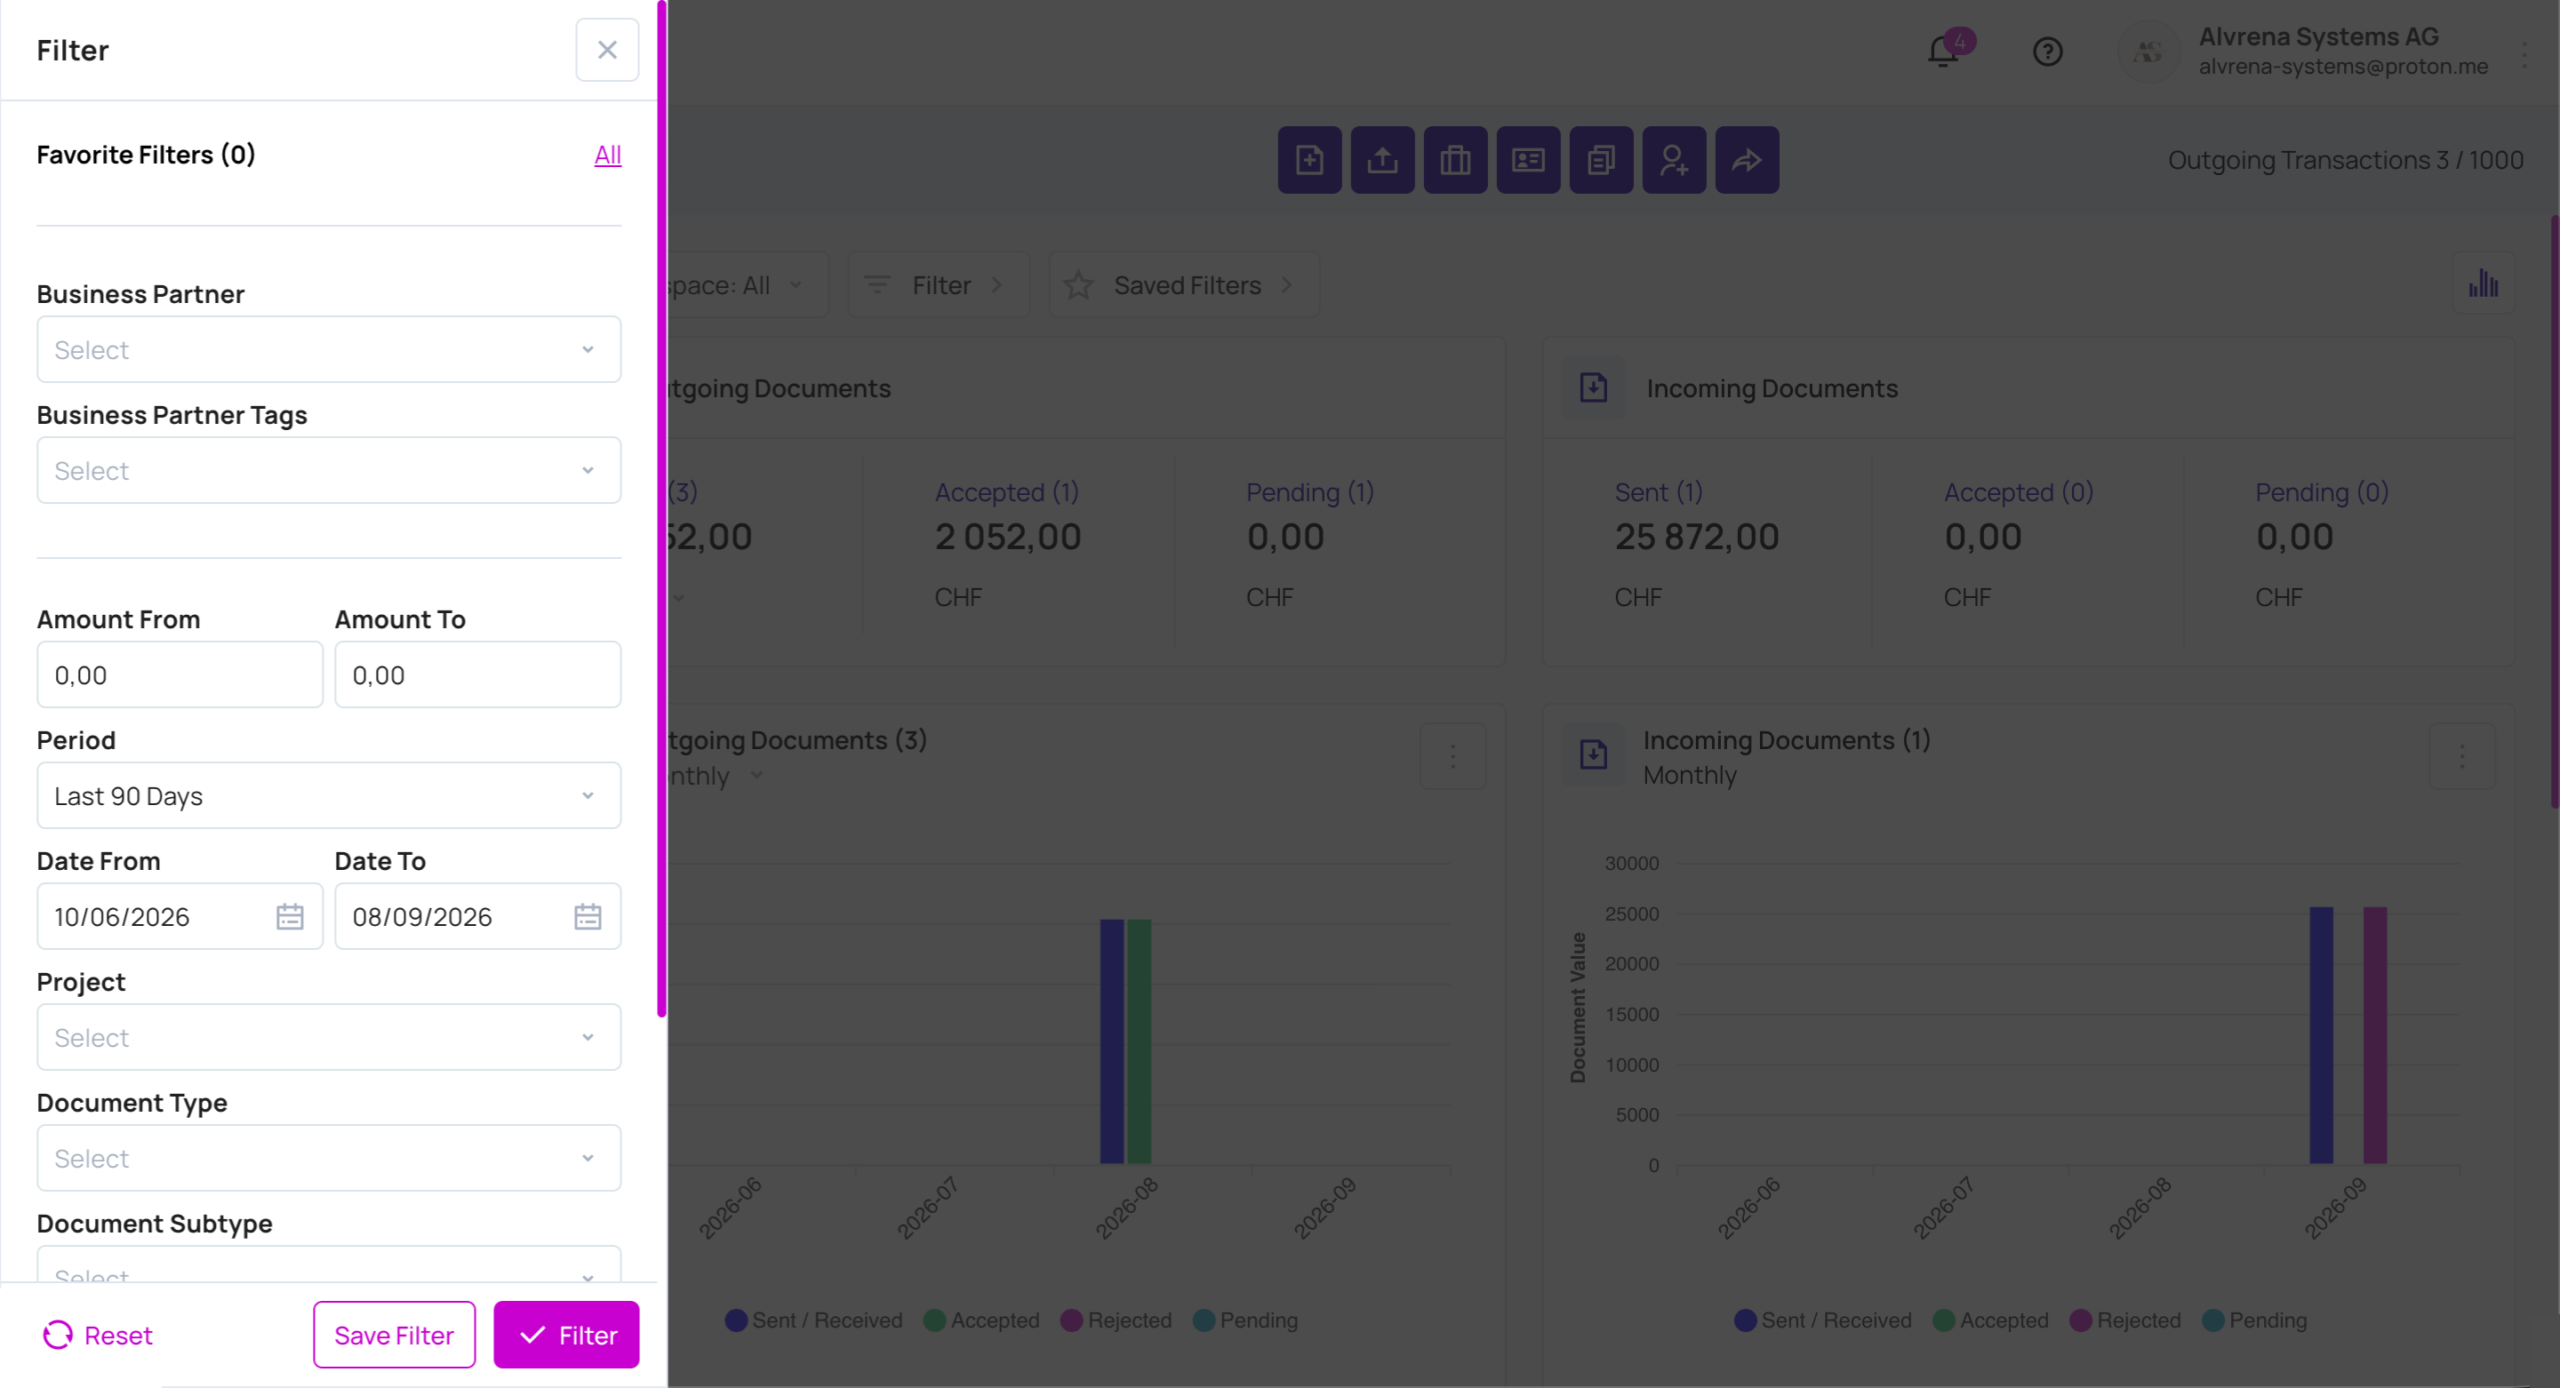
Filter otvorí panel, pomocou ktorého môžete Dashboard zúžiť podľa Obchodného partnera, Značiek obchodného partnera, Sumy od a Sumy do, Obdobia, Dátumu od a Dátumu do, Projektu, Typu dokumentu, Podtypu dokumentu, Prichádzajúcich / Odchádzajúcich, Stavu a Značiek dokumentu. Vďaka tomu môžete presne vyhľadať konkrétny dokument alebo celú skupinu dokumentov, napríklad všetky neuhradené faktúry od jedného obchodného partnera za aktuálny štvrťrok. Obnoviť vymaže nastavenia filtra, Filtrovať ich použije a Uložiť filter uloží filter na opätovné použitie.
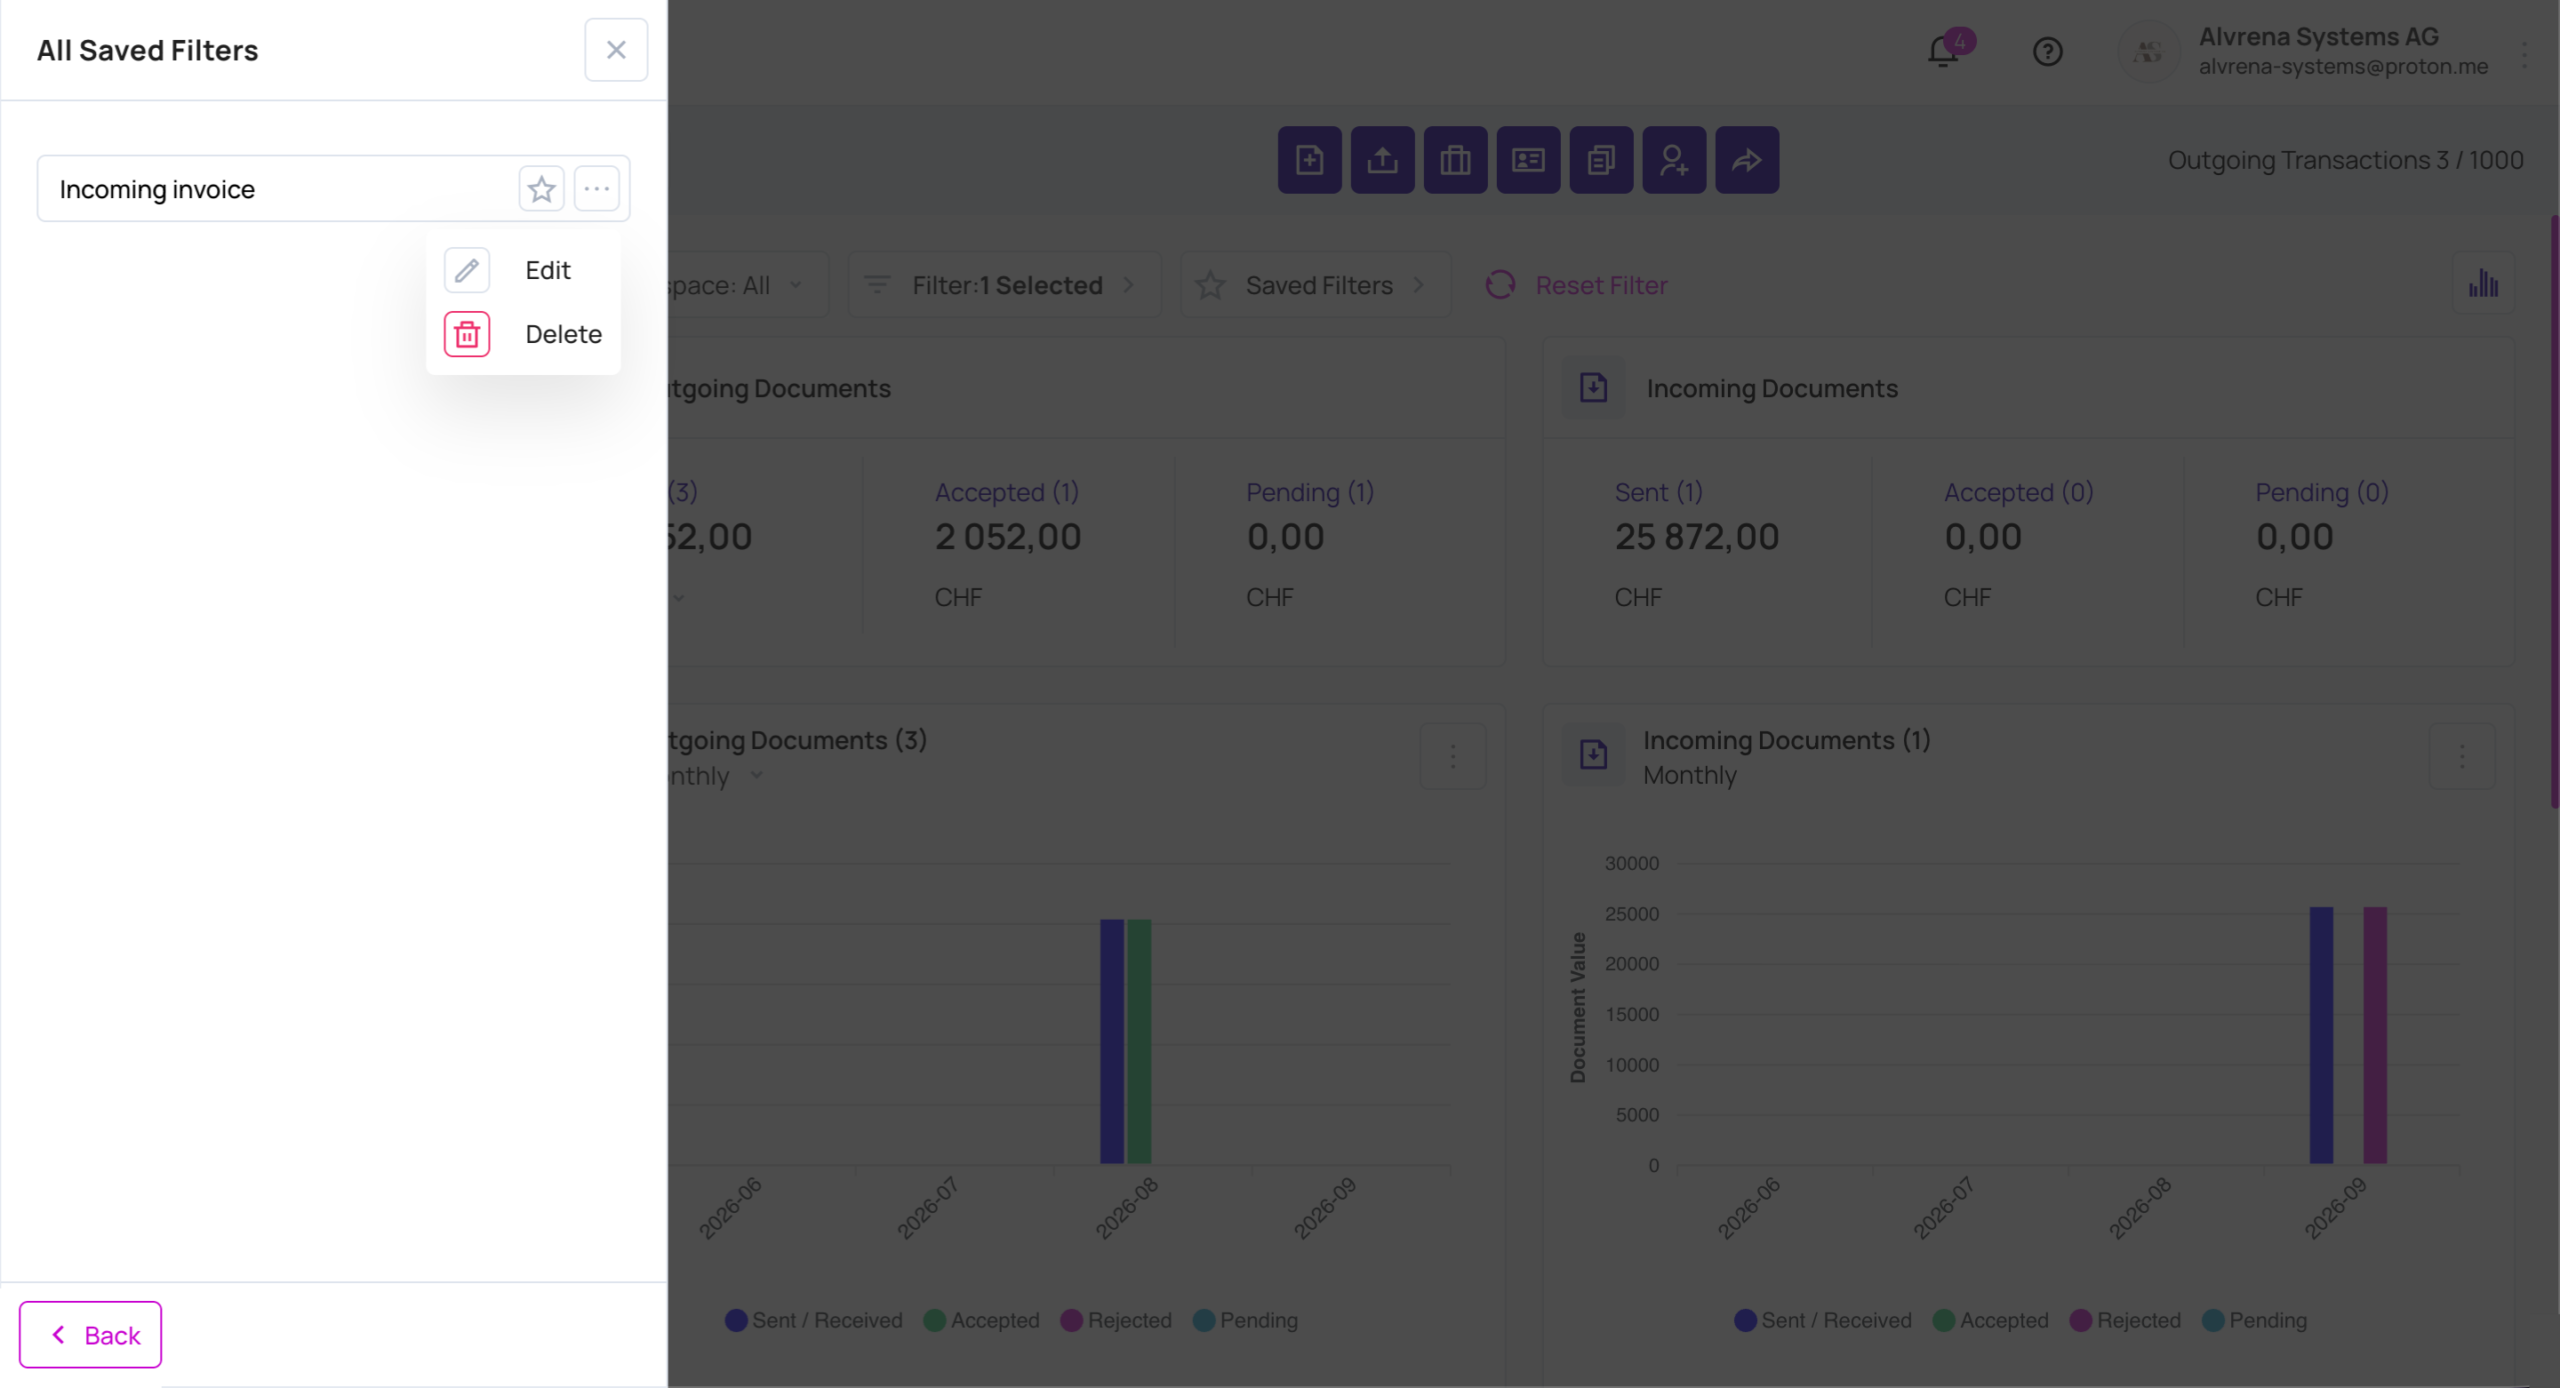
Uložené filtre otvoríte cez Uložené filtre. Každý filter môžete označiť ako obľúbený, upraviť alebo odstrániť. Uložený filter umožňuje spustiť často používané vyhľadávanie jediným kliknutím.

Poznámka: Filter určuje, ktoré dokumenty sa zobrazia v zozname aj ktoré budú zahrnuté do exportu. Exportujú sa iba vyfiltrované dokumenty. Export spustíte z ponuky zoznamu dokumentov; ďalšie informácie nájdete na stránke Ďalšie funkcie.
Pripomienky #
Moje pripomienky na domovskej stránke a stránka Pripomienky v bočnom paneli zobrazujú pripomienky priradené k dokumentom, aby ste nezabudli na potrebné následné kroky pri konkrétnych dokumentoch. Vytváranie a úprava pripomienok sú opísané na stránke Ďalšie funkcie.